Last Updated on October 20, 2020 by Larious
Well, if you have been using Windows 10 for a while, then you might know that the bugs and security issues are usually high on the platform. This is why Windows 10 receives frequent updates consisting of important bug fixes and security patches.
If you have high-speed internet, and if your internet provider offers unlimited bandwidth, then frequent updates might not create any issue. However, if you have limited internet bandwidth, you might lose all your monthly data while updating the operating system.
What’s worst is that Microsoft doesn’t offer any direct option or feature to disable the Windows updates Permanently. It does allow you to pause the updates, but it’s of no use. The Windows 10 updater starts itself and downloads all available updates silently in the background.
Disable Windows Update Service Permanently
So, to deal with all such issues, we have decided to share a working method to disable Windows Update Service quickly. You can follow this method to disable Windows Update Service permanently on Windows 10. Let’s check out.
Step 1. First of all, press Windows Key + R on your keyboard. This will open the RUN dialog box.
Step 2. Now type in ‘services.msc’ and hit Enter.
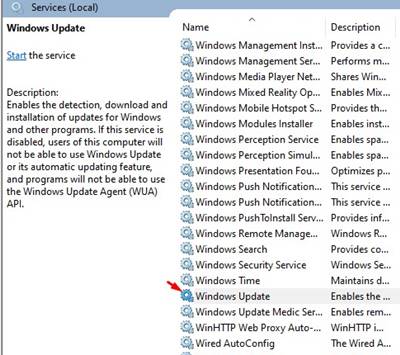
Step 3. This will open the Windows Services page.
Step 4. Scroll down and double click on the ‘Windows Update’ option.
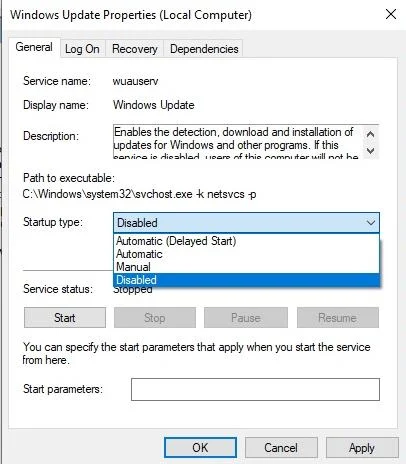
Step 5. Select ‘Disabled’ on the Startup type.
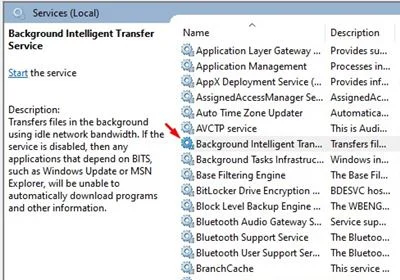
Step 6. Now go back and search for ‘Background Intelligent Transfer’. Once located, double click on it.
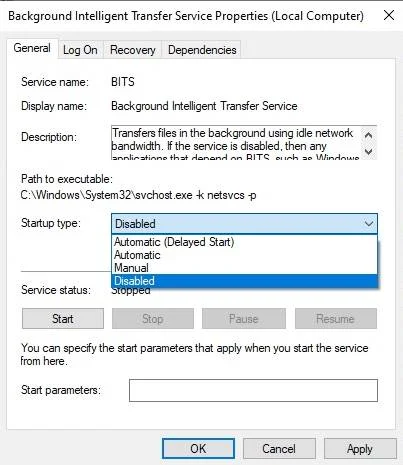
Step 7. Select ‘Disabled’ on the Startup type and click on ‘Ok’
Step 8. Now again, go back and search for ‘Delivery Optimization’. Double click on the ‘Delivery Optimization’
Step 9. Select ‘Disabled’ on the Startup type and click on ‘Ok’
Step 10. Now restart your computer to apply the changes.
That’s it! You are done. This is how you can quickly disable the Windows Update service.
So, this article is all about how to quickly disable Windows update service in 2020. If you have any doubts related to this, let us know in the comment box below. I hope this article helped you! Please share it with your friends also.


