Last Updated on March 26, 2021 by Larious
If you have been using Windows 10 for a while, you might know that the operating system does offer quite a few gaming-related offers like Xbox game bar, Screen recording application, and more. It looks like Microsoft has added a new Auto HDR to the latest Windows 10.
The Auto HDR feature is meant to improve your gaming experience on your PC. The same feature is already seen on Xbox Series S and X consoles. So, what does the feature add to the operating system? How does it improve your gaming experience? This article will discuss the Auto HDR feature of Windows 10 and how to enable it on your device.
Table of Contents
What is Auto HDR?
Auto HDR is a new gaming feature from Microsoft that automatically converts supported games from standard-dynamic-range (SDR) to high-dynamic-range (HDR). The feature unlocks the brighter and more vibrant colors available on the compatible display.
On Windows 10, enabling Auto HDR will add high-dynamic-range to thousands of DirectX 11 and DirectX 12 games. However, according to Microsoft, the Auto HDR feature won’t match the native HDR visuals, but enabling the feature will result in more colorful and vibrant gaming graphics.
The Auto HDR feature is available only on the latest Windows Insider Dev Channel release (build 21337). If you want to use the new feature, you need to join the Windows Insider program’s Dev Channel to get the latest update.
Also Read: How to Set Default GPU for Apps & Games On Windows 10
Steps to Enable Auto HDR for Games in Windows 10 PC
If you are already using the Windows 10 test build 21137, you can enable the feature straight away. Below, we have shared a step-by-step guide on enabling Windows 10 Auto HDR for gaming. Let’s check out.
Step 1. First of all, click on the Windows Start button, and select ‘Settings.’
Step 2. On the Settings page, click on the ‘System.’
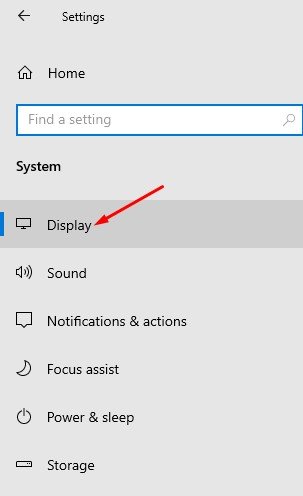
Step 3. Now on the left pane, click on the ‘Display‘ option.
Step 4. On the right pane, click on the ‘Windows HD color Settings’
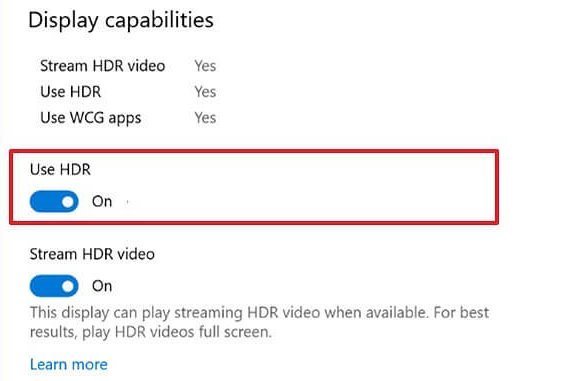
Step 5. On the Windows HD Color Settings page, scroll down and enable the ‘Use HDR’ toggle switch.
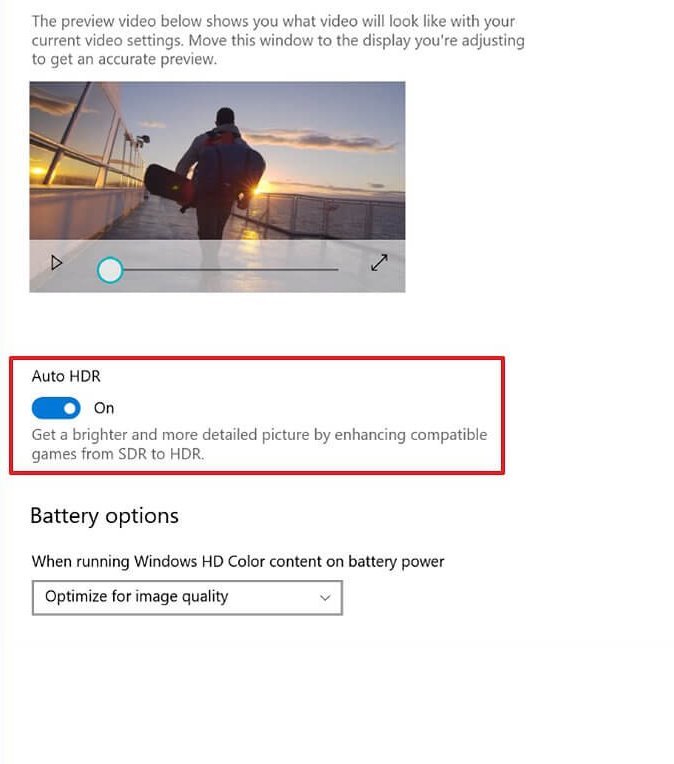
Step 6. Now scroll down, and enable the ‘Auto HDR’ option.
Step 7. Disable the feature, disable the ‘Use HDR’ and ‘Auto HDR’ option on Steps no. 5 and 6.
That’s it! You are done. Now the compatible games will automatically use HDR for brighter and vibrant color visuals.
This article is all about enabling Auto HDR for gaming on Windows 10. I hope this article helped you! Please share it with your friends also. If you have any doubts about this, let us know in the comment box below.


