Last Updated on April 19, 2023 by Larious
If you receive a server communication error in Steam, it could be due to issues with LAN settings, server downtime, VPN blocking, firewall blocking, and more. One solution is to check Steam’s server status on websites like Downdetector, and then force-quit and relaunch the app. Running Steam as an administrator may also help, as well as disabling automatic LAN settings on Windows or flushing the computer’s DNS cache on both Windows and Mac systems. Allowing Steam through your firewall or uninstalling and reinstalling Steam may also be necessary.
Do you get a server communication error in Steam on your computer? There’s a good chance your automatic LAN settings are causing the problem. Other items can also lead Steam to display this error message. Here are a few ways to get around this problem on Windows and Mac.
In addition to invalid LAN settings, other items that can cause Steam to display the above error are Steam’s own minor glitches, server downtime, a blocked VPN, a firewall blocking Steam’s access to the internet, and more.
Table of Contents
1. Check Steam’s Server Status
When you get the above error, the first thing to check is Steam’s server status. The platform’s servers may be experiencing downtime, causing the app’s various features to become unavailable.
You can head to a site like Downdetector to check if Steam is facing outages. If the site says that Steam has a server issue, you’ll have to wait until the company fixes those issues.
2. Force Close and Reopen Steam to Fix the Error Communicating Issue
Steam’s minor glitches can cause the app to not connect to the servers. In this case, force-quit and relaunch the app on your Windows or Mac computer to resolve your problem.
On Windows
- Open the Start menu, find Task Manager, and launch the utility.
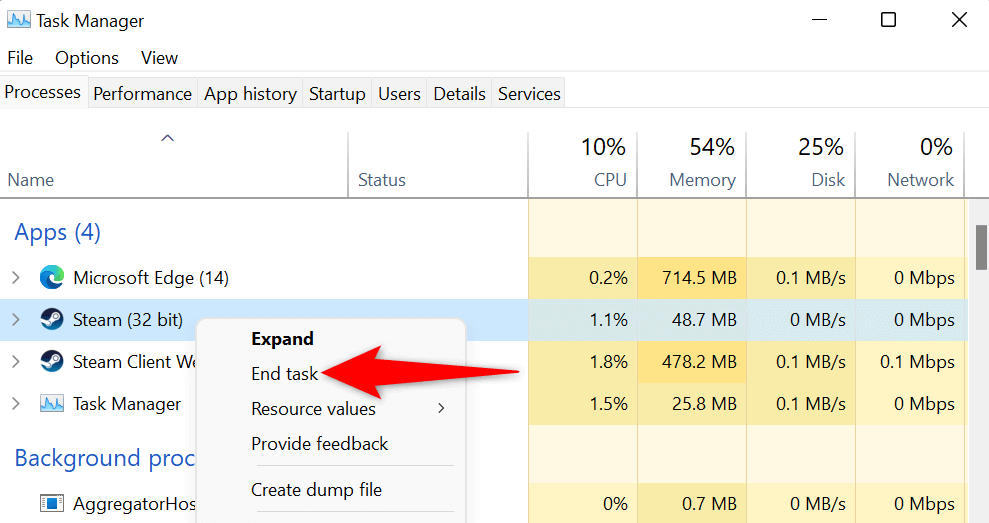
- Right-click Steam on the list and choose End task to close Steam.

- Restart Steam on your PC.
On macOS
- Press Option + Command + Esc keys on your Mac’s keyboard.
- Select Steam on the list and choose Force Quit.
- Reopen the Steam app on your Mac.
3. Run Steam As Admin
One reason Steam fails to communicate with its servers is that the app doesn’t have the required permissions to function. In this case, you can run the app as admin, giving the app all the permissions it needs to run properly.
Note that you only have to do this on a Windows PC.
- Open Start and find Steam.
- Right-click the app and choose Run as administrator.

- Select Yes in the User Account Control prompt.
4. Fix Steam by Disabling Your VPN
A VPN app routes your internet traffic through a third-party server, changing your IP address and location. Sometimes, these VPNs don’t work well with your internet-enabled apps like Steam.
In this case, turn off your VPN service and see if that fixes the issue. You can disable your service by opening your VPN app and toggling off the option on the main interface.
Then, launch the Steam client and see if your issue is resolved.
5. Disable Your PC’s Automatic LAN Settings
Windows offers an option that automatically detects and applies LAN (Local Area Network) settings to your PC. It’s possible this feature is malfunctioning, preventing Steam from connecting to its servers.
You can toggle off that Windows option to resolve your issue.
- Open the Start menu, find Internet Options, and launch that item.
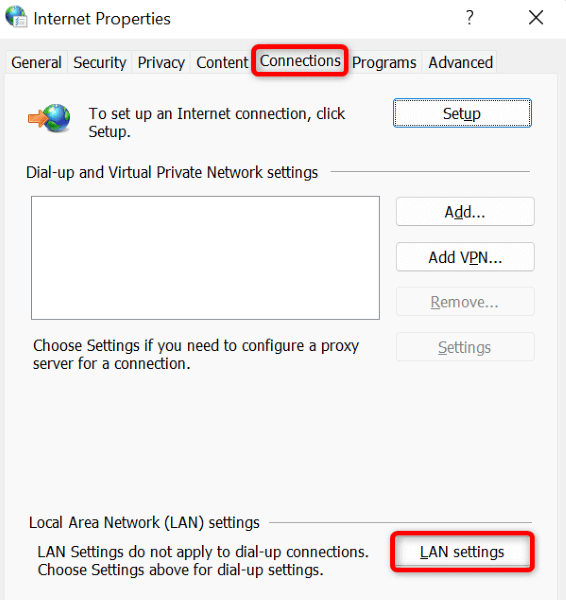
- Access the Connections tab and select the LAN settings button.

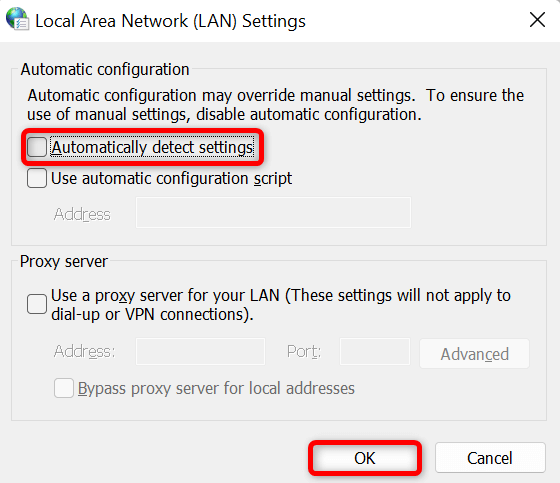
- Disable the Automatically detect settings option.

- Select OK, Apply, and then OK on the open windows.
- Quit and reopen Steam on your PC.
6. Flush Your Computer’s DNS Cache
Your computer caches DNS data to help your internet-enabled apps quickly translate domain names to IP addresses. This cache may have gone corrupt, causing Steam unable to resolve domain names to IPs.
In this case, flush your Windows or Mac machine’s DNS cache, and your issue will be resolved. Note that you won’t lose your Steam or any other data while clearing your DNS cache.
On Windows
- Open Start, find Command Prompt, and select Run as administrator.
- Choose Yes in the User Account Control prompt.
- Enter the following command on the CMD window and press Enter: ipconfig /flushdns

- After the DNS cache is cleared, run the following commands, one at a time.
ipconfig /release
ipconfig /renew - Close Command Prompt and launch Steam.
On macOS
- Open a Terminal window on your Mac.
- Type the following command in Terminal and press Enter:
sudo dscacheutil -flushcache;sudo killall -HUP mDNSResponder - Type your Mac’s admin password and press Enter. Terminal won’t display the password but type it anyway.
7. Allow Steam Through Your Firewall
Your machine’s firewall may have blocked Steam’s access to the internet, causing the app unable to communicate with its servers. You can verify this by temporarily turning off your firewall. If Steam then succeeds in connecting to its servers, you can add the app to your firewall’s whitelist so your firewall always allows Steam to connect to the internet.
On Windows
- Open Start, find Windows Security, and open the app.
- Select Firewall & network protection in the app.
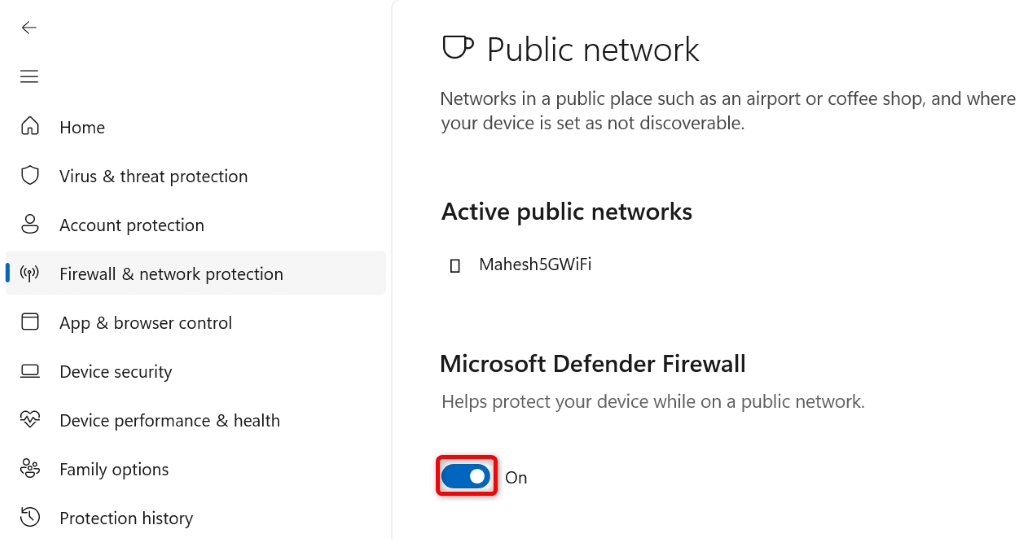
- Choose the network saying (active).
- Disable the Microsoft Defender Firewall toggle.

- Select Yes in the User Account Control prompt.
- Open the Steam app.
If Steam connects to its servers after disabling the firewall, add the Steam app to your firewall’s allowlist, as explained below:
- Open Windows Security and select Firewall & network protection.
- Choose Allow an app through firewall.

- Select Change settings at the top.
- Enable the checkbox beside Steam on the app list.

- Turn on both Private and Public checkboxes for Steam.
- Select OK at the bottom to save your changes.
On macOS
- Select the Apple logo in your Mac’s top-left corner and choose System Preferences.
- Select Security & Privacy on the following page.
- Open the Firewall tab.
- Select the padlock icon at the bottom, enter your Mac’s admin username and password, and select Unlock.
- Select the Turn Off Firewall button.
- Launch the Steam app.
8. Uninstall and Reinstall Steam
If Steam still displays an error that says the app has issues communicating with its servers, your last resort is to remove and reinstall the app on your computer. Doing so removes all of the app’s files, some of which may be problematic, causing the above issue.
Reinstalling the app brings new files, allowing you to launch and use the app without any issues.
On Windows
- Open Settings by pressing Windows + I.
- Select Apps on the left and Apps & features on the right.
- Select the three dots next to Steam on the list and choose Uninstall.

- Select Uninstall in the prompt to confirm your choice.
- Reinstall Steam from the app’s official site.
On macOS
- Open Finder and select Applications in the left sidebar.
- Find Steam on the right pane, right-click the app, and choose Move to Trash.
- Reinstall Steam from its official site.
Troubleshooting Steam’s Communicating With Server Error
There are various reasons Steam fails to communicate with its servers. Once you identify and fix the underlying item, Steam should have all the access it needs to function on your computer.
We hope the guide above resolves your Steam error, so you can get back to playing your favorite games. Happy gaming!
In conclusion, if you encounter a server communication error in Steam, there are several ways to fix it depending on the underlying cause. Checking Steam’s server status, force-closing and reopening Steam, running Steam as admin, disabling your VPN, disabling your PC’s automatic LAN settings, flushing your computer’s DNS cache, allowing Steam through your firewall, and uninstalling and reinstalling Steam are the possible solutions. By following these steps, you can resolve the issue and continue using Steam to play your favorite games without any problems.
