Last Updated on July 12, 2021 by Larious
Let’s admit, Gmail is right now the best free email service out there. Compared to every other email service, Gmail offers you better features and options.
Apart from regular email features, Gmail also supports third-party add-ons that add unique features. If you receive hundreds of emails every day, it’s best to create multiple inboxes in Gmail.
Gmail has a hidden feature that lets you create multiple inboxes for better email management. Since everyone has a different method for organization, having multiple inboxes helps you organize your Gmail’s inbox in a better way.
Steps to Enable Multiple Inboxes in Gmail
You can enable the multiple inbox feature in Gmail to split up your primary inbox into sections. Below, we have shared a step-by-step guide on how to enable Multiple inboxes in Gmail. Let’s check out.
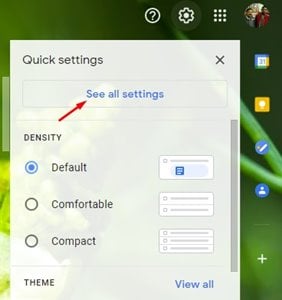
Step 1. First of all, log in to your Gmail account from your computer. Next, click on the Settings gear icon and click on ‘See all settings’
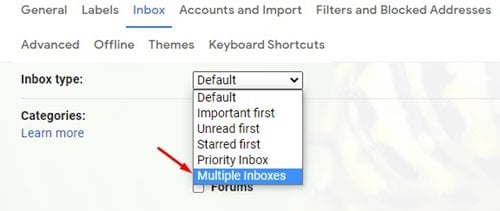
Step 2. On the Settings page, click on the ‘Inbox‘ tab, as shown in the screenshot below.
Step 3. Under the Inbox type, select ‘Multiple Inboxes’
Step 4. Gmail allows you to set up five custom sections. You need to add search queries in the custom sections. In the sections, you can enter operators like ‘from’, ‘subject, and ‘is’. Check out this webpage for all Gmail search operators.
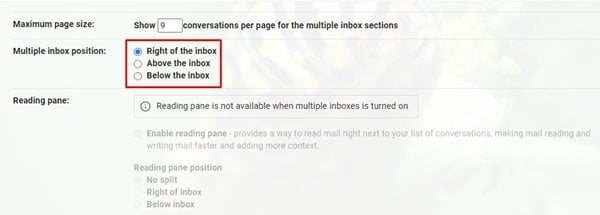
Step 5. Now scroll down and select the multiple inbox position. For example, you can select to show the inboxes in the Right, Above, or below the inbox.
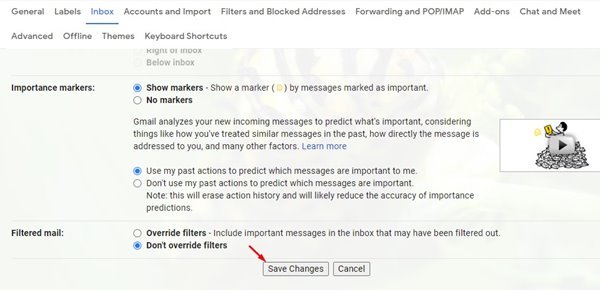
Step 6. Once done with the changes, click on the ‘Save Changes’ button.
Step 7. Once done, you will find multiple sections in your inbox.
That’s it! You are done. This is how you can create multiple inboxes in Gmail to organize your most important emails.
So, this article is all about how to create multiple inboxes in Gmail. I hope this article helped you! Please share it with your friends also. If you have any doubts related to this, let us know in the comment box below.


