Last Updated on July 12, 2021 by Larious
Spotify is the most used music streaming service in the world, and probably it is the one that simply offers you the most varieties of music. Hence, as a result, now it has almost completely replaced the physical CDs, but, the fact is that not all the time it offers the same audio quality.
What is certain is that, despite the ignorance of many of its users, the well-known music streaming platform Spotify has several levels of sound quality and we can configure it to get the exact audio quality according to our needs.
Table of Contents
Why we should change the sound quality of music on Spotify?
As we told earlier that Spotify is a streaming service and it has to consider the data consumption of its users. So, it offers the option to change the sound output quality. If you are running low on data, you can switch to a low sound quality which will help you save some data.
Apart from Streaming, the app also offers an option to download music. You can even choose to download your favorite music in different qualities.
Therefore, changing the audio quality in Spotify is one of its key functions when our data is at risk, hence, the reduced audio quality will simply reduce the weight of the files.
Different audio quality levels offered by Spotify
Here basically, you have to differentiate between free accounts and Spotify Premium accounts, as the users of both accounts do not have the same options, but neither do they have the same audio quality from both the computer and mobile devices.
- In Free account, Spotify offers audio qualities like “Automatic, Low, Normal and High“.
- In Premium account, Spotify offers audio qualities like “Automatic, Low, Normal, High and Very high“.
Steps to change the audio quality in Spotify
Below, we have shared a step-by-step guide on how to change the audio quality in Spotify app for Android. We have taken Android as an example, the steps are the same for iOS as well.
Step 1. First of all, open the Spotify app on your Android or iOS.
Step 2. Now on the main screen of the app, click on the icon in the upper right corner with a gear.
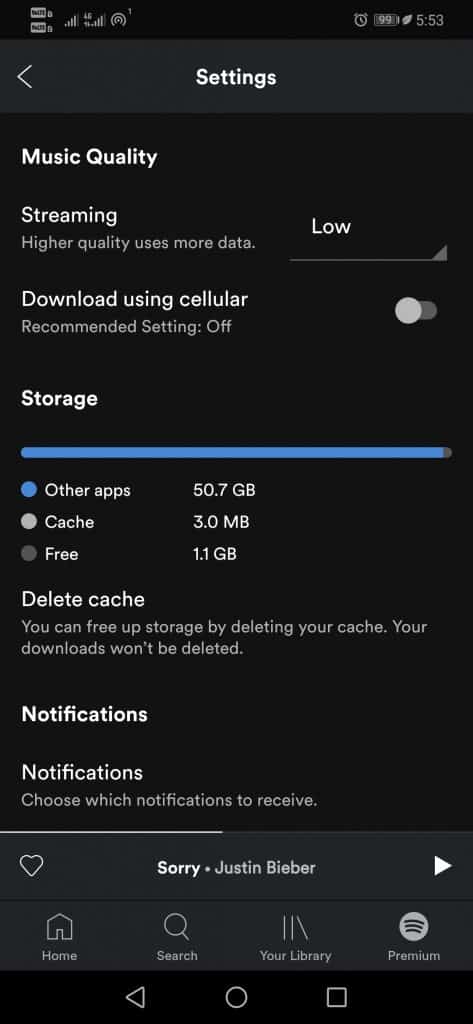
Step 3. Now simply scroll down to find the option known as “Music quality”.
Step 4. Now once you find the option that we have mentioned above simply tap on it.
Step 5. After the above step now simply select the quality according to your need.
That’s it now you are done. This is how you can change Sound Quality in the Spotify app.
So, what do you think about this? Simply share all your views and thoughts in the comment section below. And if you liked this post then simply do not forget to share this post with your friends and family.


