Last Updated on July 26, 2023 by Larious
Although Windows 11 is the best desktop operating system from Microsoft, it also requires regular maintenance to ensure better performance & reliability. Without proper optimization & regular maintenance, you will face some problems like system lag, freeze, BSOD errors, insufficient storage, etc.
In this article, we will talk about how to improve the performance of Windows 11. Although there are various ways to improve the performance of Windows 11, the best way to get started is by clearing the cache files.
By clearing the cache files, you will be able to free up precious storage on your system and will fix many apps, network, or compatibility-related issues. Hence, if you are looking for ways to clear cache in Windows 11, you are reading the right guide.
Table of Contents
List of 6 Best Methods to Clear Cache in Windows 11
In this article, we will share the few best methods to clear cache in Windows 11 operating system. Let’s check out.
1. Clear Cache via Settings
In this method, we will use the Windows 11 Settings app to clear the Windows 11 cache file. To clear cache in Windows 11 via Settings, you need to follow some of the simple steps we have shared.
1. First of all, click on the Windows 11 Start button and select Settings.
2. On the Settings app, click on the System tab as shown below.

3. On the right pane, click on the Storage option.
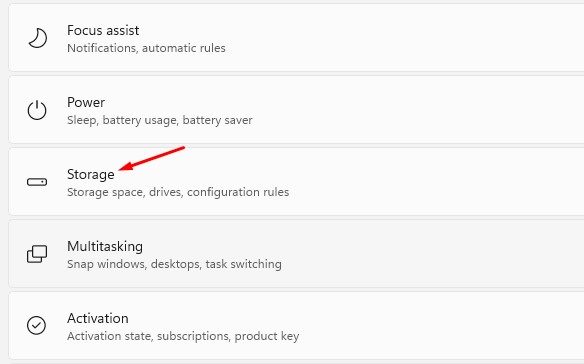
4. On the Storage page, click on the Temporary files option as shown below.

5. On the Temporary files page, just uncheck the Downloads option and click on the Remove files button.

That’s it! You are done. This is how you can clear cache in Windows 11 via the Settings app.
2. Clear Cache in Windows 11 via Disk Cleanup
In this method, we will use the Disk Cleanup utility of Windows 11 to clear the cache file. To clear the cache in Windows 11, follow some of the simple steps we have shared below.
1. First of all, press the Windows Key + R button on your keyboard. This will open the RUN dialog box.
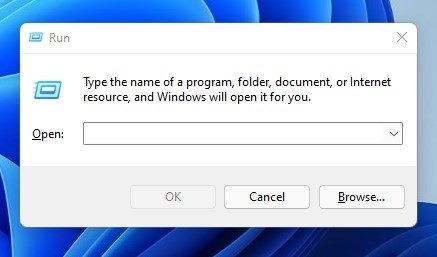
2. On the RUN dialog box, enter cleanmgr and click on the Ok button.

3. On the Disk Cleanup utility, select the C Drive and click on the Ok button.
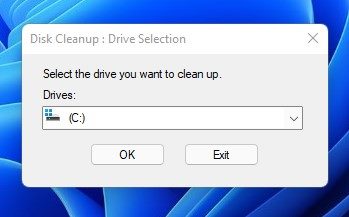
4. The Disk cleanup utility will return with all files you can delete.
5. You need to select all cached items such as Temporary files, Thumbnails, Index logs, and more. You can even select the Previous Windows Installation files to free up storage space.

6. After selecting all the items, click on the Ok button.
That’s it! You are done. This is how you can clear cache in Windows 11 via the Disk Cleanup utility.
3. Clear App Cache in Windows 11
In this method, we will clear the App cache files in Windows 11 to free up some storage. This will also fix unresponsive apps on your system. Here are some of the simple steps you need to follow.
1. First of all, press the Windows Key + R button on your keyboard. This will open the RUN dialog box.

2. On the RUN dialog box, type in %tmp% and press the Enter button.

3. This will open the Temp folder on your system. Here you need to delete everything.

That’s it! You are done. This is how you can clear app cache in Windows 11 operating system.
4. Flush DNS Cache in Windows 11
Windows 11 also allows you to flush DNS cache in simple steps. Clearing the DNS cache will fix internet-related problems on your PC. So, if you are experiencing internet-related problems on your PC, it’s best to flush the DNS cache first.
However, Windows 11 doesn’t provide you with any direct option to flush the DNS cache. You need to rely on the Command Prompt to clear your DNS cache in Windows 11. We have shared a detailed guide on how to flush the DNS cache in Windows 11. You need to go through the article to know the steps.
5. Configure Storage Sense on Windows 11
Storage Sense is a built-in feature of Windows 11 that automatically cleans junk files. You can configure Storage Sense on your PC to delete Recycle bin items, app cache, icon cache, and more. Here’s how to configure Storage sense on Windows 11.
1. First of all, navigate to the Settings > System > Storage.
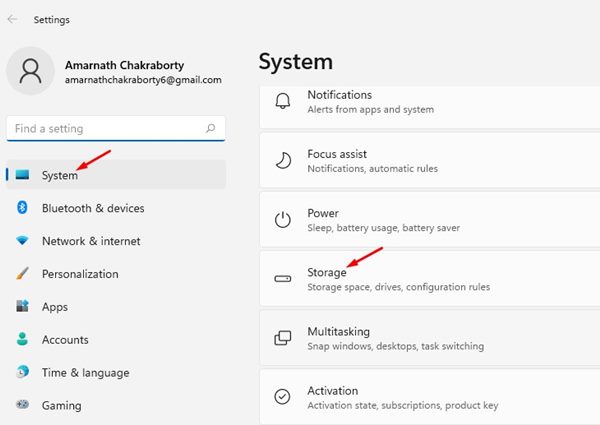
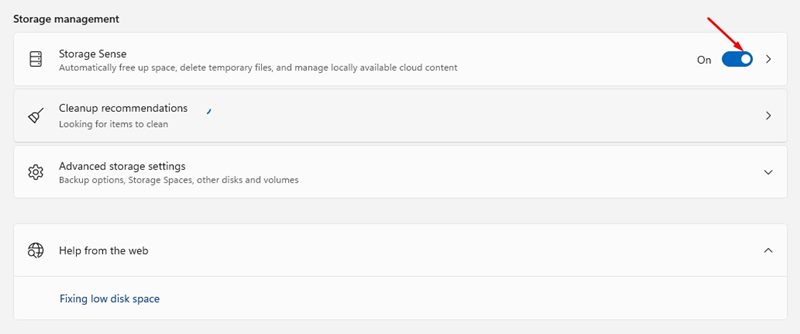
2. On the Storage page, turn on the Storage Sense toggle. Next, click on the Storage sense.
3. On the Storage Sense Window, enable the first two options.
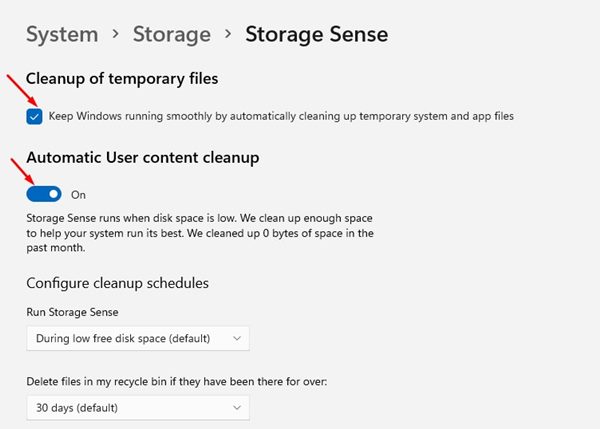
That’s it! You are done. This will automatically clean the temporary files stored on your Windows 11 PC.
6. Clear Microsoft Store Cache
Well, if you are experiencing problems related to the Microsoft Store, then you need to clear the Microsoft Store cache files. Clearing the Microsoft Store cache will fix issues such as apps not downloading, Microsoft Store not opening, etc. Here’s how you can clear the Microsoft Store cache in Windows 11.
1. First of all, press the Windows Key + R button on your Keyboard. This will open the RUN dialog box.

2. On the RUN dialog box, type in WSReset and hit the Enter button.

3. This will flush the Microsoft Store cache on your Windows 11 computer.

That’s it! You are done. This is how you can clear the Microsoft Store cache on Windows 11 to fix Microsoft Store related problems.
7. Use Advanced SystemCare
Advanced SystemCare from iObit is an ultimate third-party tool to speed up computers and clean up junk files, leftovers, caches, and browser cache files. Here’s how to use the tool to clear the cache in Windows 11.
1. Download & install the latest version of Advanced SystemCare Installer on your computer.
2. Once installed, open the installer file and uncheck the bundled programs.

3. Once unchecked, click on the Install button.
4. Now wait until Advanced System Care installs on your computer.

5. Once installed, open the program and switch to Manual mode. Now select all relevant cleanup items and click on the Scan button.

6. Advanced SystemCare will find all files that can be cleaned from your computer. Click on the Fix button to clean those junk and cache files.

That’s it! This is how you can use Advanced SystemCare to Clear Cache on Windows 11.
These are the few best methods to clear cache in Windows 11. By clearing the cache, you will also be able to free up some storage space on your system. I hope this article helped you! Please share it with your friends also. If you have any doubts related to this, let us know in the comment box below.
