Last Updated on June 7, 2023 by Larious
Summarize this content to 100 words
When you purchase a new Logitech wireless mouse, it should offer the option to connect via either a wireless receiver or Bluetooth. It may even support both methods, giving you the flexibility to choose the best way to pair it to your PC or Mac.
This tutorial will walk you through the steps to connect your Logitech wireless mouse to your computer through a wireless receiver or Bluetooth.
Connect a Logitech Mouse to Computer via Wireless Receiver
If your Logitech wireless mouse comes with a standard USB dongle, just plug it into a USB port on your PC or Mac, turn on your mouse, and it should be ready to go. It’s good practice to avoid connecting the receiver to external USB hubs.
If it’s bundled with a Logitech Unifying receiver (you can identify it with the orange Unifying logo), you should still be able to plug and play. However, if that doesn’t work, you must use the Logitech Unifying Software to pair the mouse and receiver manually. Use a wired mouse or trackpad to interact with your computer in the meantime.
Download the Logitech Unifying Software utility on your PC or Mac. Then, run the setup file and follow all on screen instructions to install it.
Plug the Logitech Unifying receiver into a USB slot on your computer.
Launch the Logitech Unifying Software utility via the Start menu (PC) or Launchpad (Mac).
Select Next on the Logitech Unifying Software Welcome screen.
Locate the Power switch on the side or bottom of the mouse and turn it on. If it’s already on, switch it off, then back on.
A “We have detected your mouse” screen should appear momentarily. Move the mouse around—if the cursor moves, pick the Yes radio button option and select Next.
Select No if the cursor won’t move to repeat the pairing process. You might want to connect to a different USB port and check the battery compartment for a battery isolation tab (remove it if you spot one) before you do that.
Select Finish.
If your Logitech wireless mouse displays a Unifying symbol but does not include a Unifying receiver in its packaging, you can purchase one separately to use this feature.
Note: You can use the Logitech Unifying Software to connect up to six Logitech devices—wireless keyboards, mice, and trackpads—to the same Unifying receiver.
A handful of newer Logitech wireless mice—e.g., the Logitech Lift Ergonomic—come with the Logi Bolt receiver (denoted by a green Bolt icon). Like with the Unifying receiver, you can plug it in and use the mouse immediately or use the Logi Bolt App to pair it manually.
Connect Logitech Mouse to Computer via Bluetooth
If your Logitech wireless mouse works over Bluetooth (look for the Bluetooth logo on the mouse or packaging), you can set it up without needing a wireless receiver, as long as your computer also has Bluetooth capabilities.
Some wireless mice, such as the Logitech MX Master, support Bluetooth and Unifying/Bolt technology, so it’s up to you to pick between the two methods.
Note: If your mouse lets you pair it with multiple devices over Bluetooth, you must choose the channel you want to assign to the device before you begin, such as 1, 2, or 3—press the Pair button repeatedly to cycle between channels.
Connect Logitech Mouse via Bluetooth – Windows
Right-click the Start button (or press Windows + X) and select Settings.
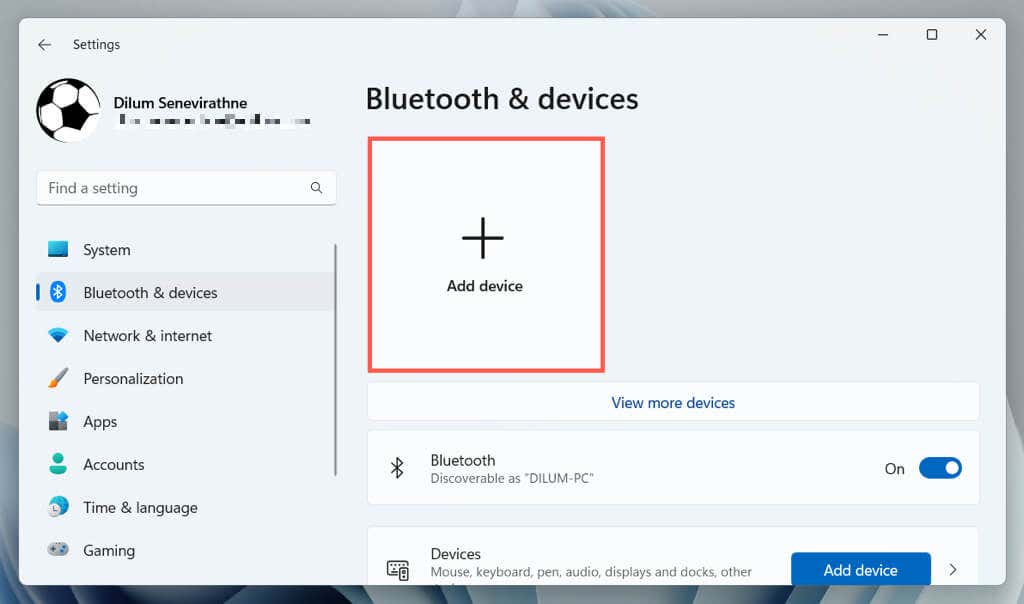
Select Bluetooth & devices and choose Add device.
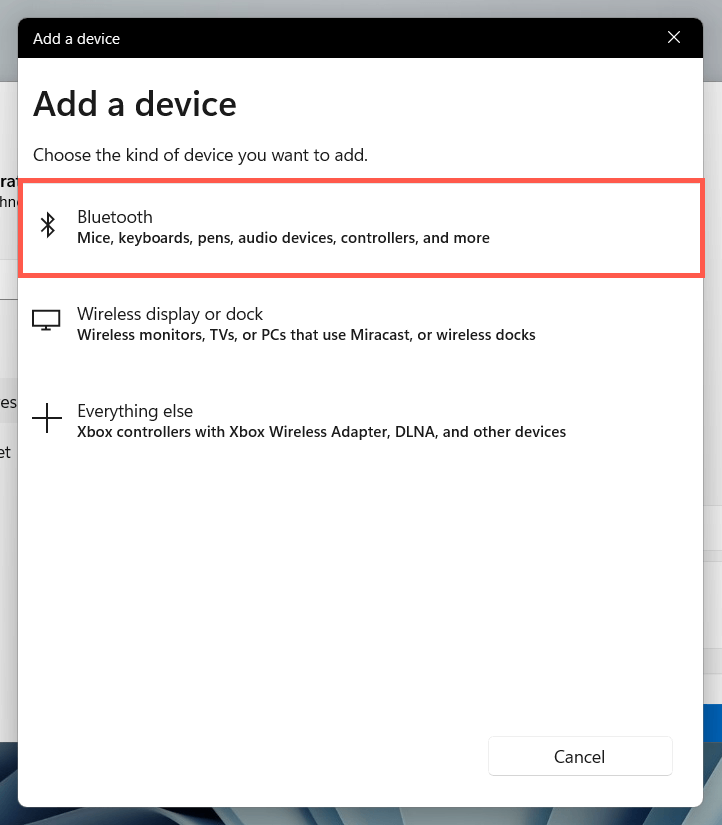
Select Bluetooth.
Press and hold the Pair button on your Logitech Bluetooth mouse.
Note: Depending on your mouse model, the channel LED indicator may blink fast to confirm you’ve entered pairing mode.
Select the mouse when it shows up within the “Add a device” pane.
Select Done to confirm the Bluetooth pairing.
Connect Logitech Mouse via Bluetooth – macOS
Open the Control Center on your MacBook, iMac, or Mac mini and expand the Bluetooth control. Or, select the Bluetooth icon on the menu bar.
Select Bluetooth Settings.
Press and hold the Pair button on the Bluetooth mouse to enter pairing mode, and select the Connect button when the mouse shows up under the Nearby Devices section
Customize Your Logitech Mouse
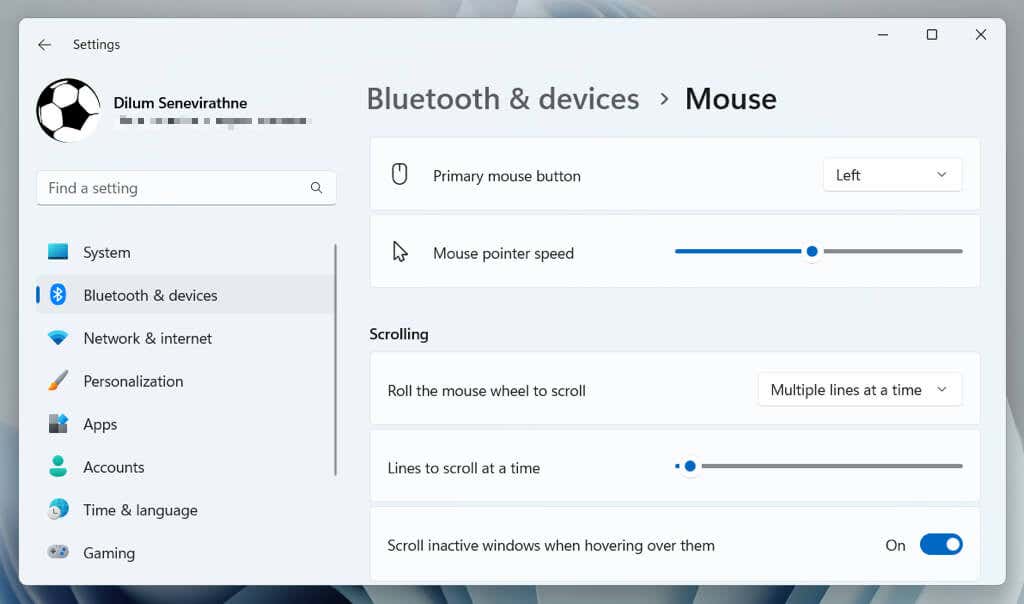
After connecting your Logitech wireless mouse to your Microsoft Windows or Mac computer, you’ll want to customize how it works. On the PC, open the Settings app and go to Bluetooth & devices > Mouse.
Here, you can determine the pointer speed, the mouse button orientation, scroll speeds, etc. You can also select Additional mouse settings to modify other aspects of the mouse, such as the double-click speed, pointer shape, and more.
On the Mac, open the Apple menu, select System Preferences/Settings, and select the Mouse category to change the tracking speed, scrolling direction, scrolling speed, and double-click speed.
Install and Use Logi Options+
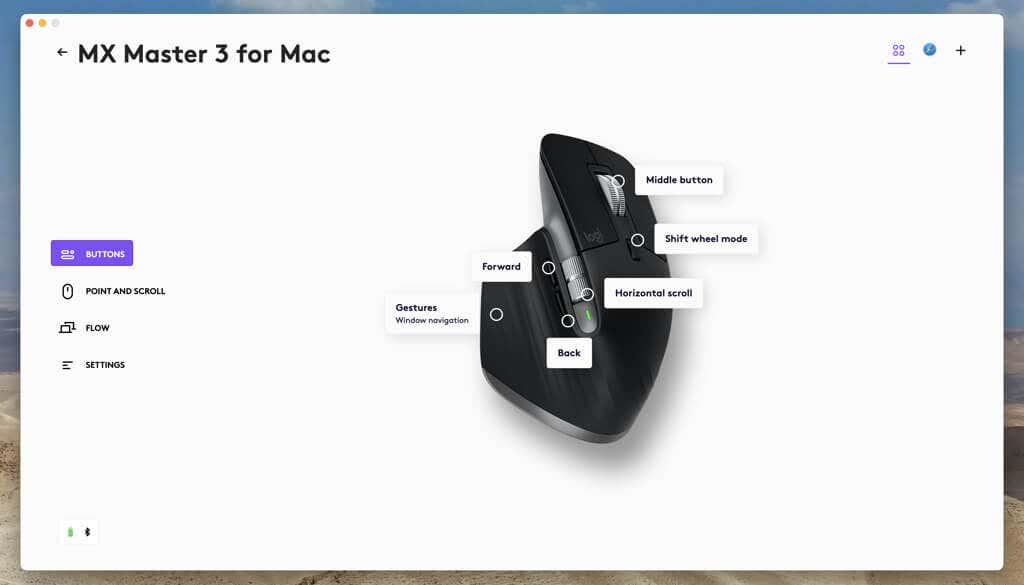
Logi Options+ is a Logitech utility that allows you to customize your Logitech mouse’s buttons, gestures, and other settings further. Install it, and your mouse—including other wired and wireless devices from Logitech—should automatically appear within the app.
Depending on your mouse, you may see various customization options, such as binding different actions to buttons, fine-tuning the pointer and scroll wheel, installing firmware updates, etc. Sign in with a Logitech account to sync your mouse settings and preferences between devices.
Connect Your Logitech Wireless Mouse with Ease
Connecting a wireless Logitech mouse to your PC or Mac isn’t complicated. You can easily set it up with the USB receiver inside the packaging or pair it with Bluetooth. Once connected, don’t forget to customize the mouse settings in your operating system and enhance its functionality by downloading and installing Logi Options+.
If you encounter wireless or Bluetooth connectivity issues, check our Logitech mouse troubleshooting guide for ways to fix the problem.
When you purchase a new Logitech wireless mouse, it should offer the option to connect via either a wireless receiver or Bluetooth. It may even support both methods, giving you the flexibility to choose the best way to pair it to your PC or Mac.
This tutorial will walk you through the steps to connect your Logitech wireless mouse to your computer through a wireless receiver or Bluetooth.
Table of Contents
Connect a Logitech Mouse to Computer via Wireless Receiver
If your Logitech wireless mouse comes with a standard USB dongle, just plug it into a USB port on your PC or Mac, turn on your mouse, and it should be ready to go. It’s good practice to avoid connecting the receiver to external USB hubs.
If it’s bundled with a Logitech Unifying receiver (you can identify it with the orange Unifying logo), you should still be able to plug and play. However, if that doesn’t work, you must use the Logitech Unifying Software to pair the mouse and receiver manually. Use a wired mouse or trackpad to interact with your computer in the meantime.
- Download the Logitech Unifying Software utility on your PC or Mac. Then, run the setup file and follow all on screen instructions to install it.

- Plug the Logitech Unifying receiver into a USB slot on your computer.

- Launch the Logitech Unifying Software utility via the Start menu (PC) or Launchpad (Mac).

- Select Next on the Logitech Unifying Software Welcome screen.

- Locate the Power switch on the side or bottom of the mouse and turn it on. If it’s already on, switch it off, then back on.

- A “We have detected your mouse” screen should appear momentarily. Move the mouse around—if the cursor moves, pick the Yes radio button option and select Next.

Select No if the cursor won’t move to repeat the pairing process. You might want to connect to a different USB port and check the battery compartment for a battery isolation tab (remove it if you spot one) before you do that.
- Select Finish.

If your Logitech wireless mouse displays a Unifying symbol but does not include a Unifying receiver in its packaging, you can purchase one separately to use this feature.
Note: You can use the Logitech Unifying Software to connect up to six Logitech devices—wireless keyboards, mice, and trackpads—to the same Unifying receiver.
A handful of newer Logitech wireless mice—e.g., the Logitech Lift Ergonomic—come with the Logi Bolt receiver (denoted by a green Bolt icon). Like with the Unifying receiver, you can plug it in and use the mouse immediately or use the Logi Bolt App to pair it manually.
Connect Logitech Mouse to Computer via Bluetooth
If your Logitech wireless mouse works over Bluetooth (look for the Bluetooth logo on the mouse or packaging), you can set it up without needing a wireless receiver, as long as your computer also has Bluetooth capabilities.
Some wireless mice, such as the Logitech MX Master, support Bluetooth and Unifying/Bolt technology, so it’s up to you to pick between the two methods.
Note: If your mouse lets you pair it with multiple devices over Bluetooth, you must choose the channel you want to assign to the device before you begin, such as 1, 2, or 3—press the Pair button repeatedly to cycle between channels.
Connect Logitech Mouse via Bluetooth – Windows
- Right-click the Start button (or press Windows + X) and select Settings.

- Select Bluetooth & devices and choose Add device.

- Select Bluetooth.

- Press and hold the Pair button on your Logitech Bluetooth mouse.

Note: Depending on your mouse model, the channel LED indicator may blink fast to confirm you’ve entered pairing mode.
- Select the mouse when it shows up within the “Add a device” pane.

- Select Done to confirm the Bluetooth pairing.

Connect Logitech Mouse via Bluetooth – macOS
- Open the Control Center on your MacBook, iMac, or Mac mini and expand the Bluetooth control. Or, select the Bluetooth icon on the menu bar.

- Select Bluetooth Settings.

- Press and hold the Pair button on the Bluetooth mouse to enter pairing mode, and select the Connect button when the mouse shows up under the Nearby Devices section

Customize Your Logitech Mouse
After connecting your Logitech wireless mouse to your Microsoft Windows or Mac computer, you’ll want to customize how it works. On the PC, open the Settings app and go to Bluetooth & devices > Mouse.

Here, you can determine the pointer speed, the mouse button orientation, scroll speeds, etc. You can also select Additional mouse settings to modify other aspects of the mouse, such as the double-click speed, pointer shape, and more.
On the Mac, open the Apple menu, select System Preferences/Settings, and select the Mouse category to change the tracking speed, scrolling direction, scrolling speed, and double-click speed.
Install and Use Logi Options+
Logi Options+ is a Logitech utility that allows you to customize your Logitech mouse’s buttons, gestures, and other settings further. Install it, and your mouse—including other wired and wireless devices from Logitech—should automatically appear within the app.

Depending on your mouse, you may see various customization options, such as binding different actions to buttons, fine-tuning the pointer and scroll wheel, installing firmware updates, etc. Sign in with a Logitech account to sync your mouse settings and preferences between devices.
Connect Your Logitech Wireless Mouse with Ease
Connecting a wireless Logitech mouse to your PC or Mac isn’t complicated. You can easily set it up with the USB receiver inside the packaging or pair it with Bluetooth. Once connected, don’t forget to customize the mouse settings in your operating system and enhance its functionality by downloading and installing Logi Options+.
If you encounter wireless or Bluetooth connectivity issues, check our Logitech mouse troubleshooting guide for ways to fix the problem.
conclusion When you purchase a new Logitech wireless mouse, it should offer the option to connect via either a wireless receiver or Bluetooth. It may even support both methods, giving you the flexibility to choose the best way to pair it to your PC or Mac. This tutorial will walk you through the steps to connect your Logitech wireless mouse to your computer through a wireless receiver or Bluetooth. Connect a Logitech Mouse to Computer via Wireless Receiver If your Logitech wireless mouse comes with a standard USB dongle, just plug it into a USB port on your PC or Mac, turn on your mouse, and it should be ready to go. It’s good practice to avoid connecting the receiver to external USB hubs. If it’s bundled with a Logitech Unifying receiver (you can identify it with the orange Unifying logo), you should still be able to plug and play. However, if that doesn’t work, you must use the Logitech Unifying Software to pair the mouse and receiver manually. Use a wired mouse or trackpad to interact with your computer in the meantime. Download the Logitech Unifying Software utility on your PC or Mac. Then, run the setup file and follow all on screen instructions to install it. Plug the Logitech Unifying receiver into a USB slot on your computer. Launch the Logitech Unifying Software utility via the Start menu (PC) or Launchpad (Mac). Select Next on the Logitech Unifying Software Welcome screen. Locate the Power switch on the side or bottom of the mouse and turn it on. If it’s already on, switch it off, then back on. A “We have detected your mouse” screen should appear momentarily. Move the mouse around—if the cursor moves, pick the Yes radio button option and select Next. Select No if the cursor won’t move to repeat the pairing process. You might want to connect to a different USB port and check the battery compartment for a battery isolation tab (remove it if you spot one) before you do that. Select Finish. If your Logitech wireless mouse displays a Unifying symbol but does not include a Unifying receiver in its packaging, you can purchase one separately to use this feature. Note: You can use the Logitech Unifying Software to connect up to six Logitech devices—wireless keyboards, mice, and trackpads—to the same Unifying receiver. A handful of newer Logitech wireless mice—e.g., the Logitech Lift Ergonomic—come with the Logi Bolt receiver (denoted by a green Bolt icon). Like with the Unifying receiver, you can plug it in and use the mouse immediately or use the Logi Bolt App to pair it manually. Connect Logitech Mouse to Computer via Bluetooth If your Logitech wireless mouse works over Bluetooth (look for the Bluetooth logo on the mouse or packaging), you can set it up without needing a wireless receiver, as long as your computer also has Bluetooth capabilities. Some wireless mice, such as the Logitech MX Master, support Bluetooth and Unifying/Bolt technology, so it’s up to you to pick between the two methods. Note: If your mouse lets you pair it with multiple devices over Bluetooth, you must choose the channel you want to assign to the device before you begin, such as 1, 2, or 3—press the Pair button repeatedly to cycle between channels. Connect Logitech Mouse via Bluetooth – Windows Right-click the Start button (or press Windows + X) and select Settings. Select Bluetooth & devices and choose Add device. Select Bluetooth. Press and hold the Pair button on your Logitech Bluetooth mouse. Note: Depending on your mouse model, the channel LED indicator may blink fast to confirm you’ve entered pairing mode. Select the mouse when it shows up within the “Add a device” pane. Select Done to confirm the Bluetooth pairing. Connect Logitech Mouse via Bluetooth – macOS Open the Control Center on your MacBook, iMac, or Mac mini and expand the Bluetooth control. Or, select the Bluetooth icon on the menu bar. Select Bluetooth Settings. Press and hold the Pair button on the Bluetooth mouse to enter pairing mode, and select the Connect button when the mouse shows up under the Nearby Devices section Customize Your Logitech Mouse After connecting your Logitech wireless mouse to your Microsoft Windows or Mac computer, you’ll want to customize how it works. On the PC, open the Settings app and go to Bluetooth & devices > Mouse. Here, you can determine the pointer speed, the mouse button orientation, scroll speeds, etc. You can also select Additional mouse settings to modify other aspects of the mouse, such as the double-click speed, pointer shape, and more. On the Mac, open the Apple menu, select System Preferences/Settings, and select the Mouse category to change the tracking speed, scrolling direction, scrolling speed, and double-click speed. Install and Use Logi Options+ Logi Options+ is a Logitech utility that allows you to customize your Logitech mouse’s buttons, gestures, and other settings further. Install it, and your mouse—including other wired and wireless devices from Logitech—should automatically appear within the app. Depending on your mouse, you may see various customization options, such as binding different actions to buttons, fine-tuning the pointer and scroll wheel, installing firmware updates, etc. Sign in with a Logitech account to sync your mouse settings and preferences between devices. Connect Your Logitech Wireless Mouse with Ease Connecting a wireless Logitech mouse to your PC or Mac isn’t complicated. You can easily set it up with the USB receiver inside the packaging or pair it with Bluetooth. Once connected, don’t forget to customize the mouse settings in your operating system and enhance its functionality by downloading and installing Logi Options+. If you encounter wireless or Bluetooth connectivity issues, check our Logitech mouse troubleshooting guide for ways to fix the problem.

