Last Updated on March 7, 2023 by Larious
In one of our articles, we discussed how to download & install Virtualbox on PC. After sharing that article, many users messaged us asking about creating virtual machines with VirtualBox.
So, if you have just installed VirtualBox on your computer and need help figuring out what to do next, continue reading the article. In this article, we will share some easy steps that will let you create virtual machines with VirtualBox.
Table of Contents
Creating Virtual Machines with VirtualBox
VirtualBox itself is open-source software for virtualizing. The program allows you to use your PC’s storage to create a virtual environment for other operating systems.
You can’t directly run programs on VirtualBox; you must create a virtual machine, install an operating system, and test the programs.
Since VirtualBox is open-source software, it’s completely free to use. With VirtualBox, you can create unlimited virtual machines on your computer, provided your hardware specification allows it.
How to Create Virtual Machines with VirtualBox
If you have installed VirtualBox and looking for ways to run multiple OS simultaneously, you need to create a virtual machine and install an operating system.
Let’s say you want to use Windows XP on your VirtualBox; for that, you must create a virtual machine that can run Windows XP effortlessly. You must allocate enough RAM, CPU cores, Video Memory, and other things to run Windows XP smoothly on VM.
Download & Install VirtualBox on PC
The very first step includes downloading and installing VirtualBox on a PC. If you want to enjoy the maximum benefits, it’s recommended to download & install the latest version of VirtualBox on your computer.
VirtualBox is available for all operating systems, including Windows, MacOS, and Linux. Follow our guide Download & Install VirtualBox to install the software package on your computer.
Easy Steps to Create Virtual Machines with VirtualBox
We will be sharing some simple steps that will help you get started. Here’s how you can create virtual machines with VirtualBox in Windows.
Important: We will use a Windows XP ISO file to demonstrate creating a virtual machine. You must follow the same steps for other ISO files you want to install on a virtual machine.
1. First of all, download and install VirtualBox on your computer.
2. When the app installs, open it from the Start Menu or the desktop shortcut.
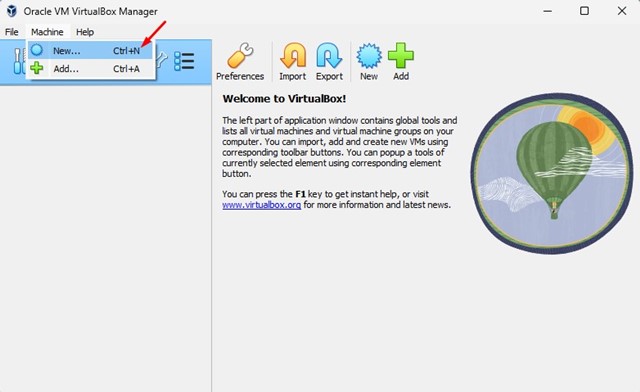
3. Upon opening the program for the first time, you will see a screen like the one below.

4. On the top bar, click on the Machine.

5. Select ‘New‘ from the list of options that appears.

6. Now, you will see the Create Virtual Machine Prompt.
7. Assign a name to your virtual machine, and select the folder where you want to store your files.

8. On the ISO Image, click the drop-down and select ‘Other‘. Next, select the ISO file of the operating system you want to install.

9. Next, check the ‘Skip unattended installation‘ option and click the Next button.

10. Now, on the Hardware prompt, select the base memory (RAM) and Processor (CPU Cores) and click the Next button.

Important: Base Memory should be more than what the operating system requires. For example, Windows XP needs 512 MB of minimum memory; hence you should put 1024 MB in the VirtualBox. Things will go well if you allocate recommended hardware requirements for the OS.
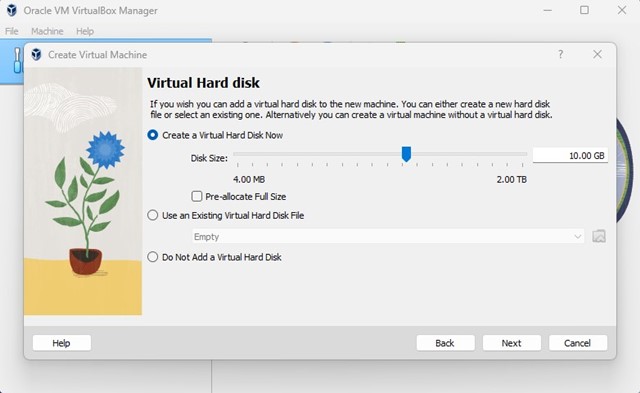
11. Next, on the Virtual Hard Disk prompt, select the ‘Create a Virtual Hard Disk Now’option and allocate the Disk Size. Once done, click on the Next button.

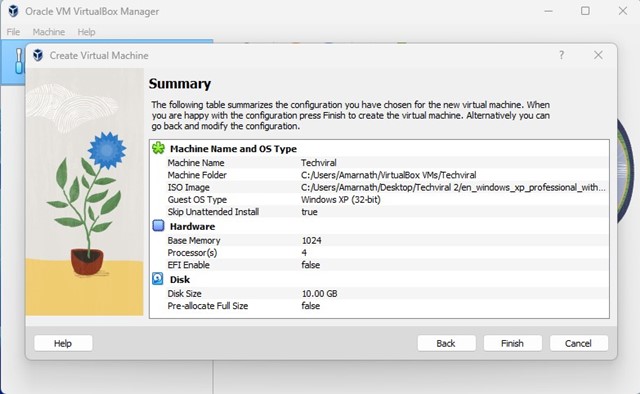
12. Confirm all your selections on the Summary and click the Finish button.

13. The virtual machine will be created. Now you can run the virtual machine by clicking on the Start button.

That’s it! Depending on the ISO file you selected, you will have to go through the OS Installation wizard.
How to Edit Virtual Machine in VirtualBox
You don’t need to remove the entire virtual machine to make some modifications. You can edit the virtual machines you have created in easy steps without deleting them.
1. Select the virtual machine you want to edit on the right side.
2. Once selected, click on the Settings icon at the top.

3. You will find various options to edit. For example, if you want to increase the RAM of your virtual machine, switch to the System tab.

4. Next, adjust the Base Memory, Processor, etc. After making the changes, click on the Ok button.
5. Similarly, you can adjust the Display, Storage, Network, and many other things.

That’s it! This is how you can edit virtual machines in VirtualBox without deleting them.
Also Read: How to Download & Install VirtualBox on Windows 11 PC
Virtual Machine is a vast subject, and VirtualBox is only the means to enter the virtual environment. VirtualBox opens the door for you to test programs that you feel suspicious of. Also, you can test different operating without installing them as the primary OS on your PC. If you need more help installing Virtual Machine in VirtualBox, let us know in the comments.
