Last Updated on June 15, 2022 by Larious

Microsoft introduced a fully redesigned Start menu & a new taskbar design on Windows 11. While the new Start menu looks good and fits well with the default theme, Microsoft is still trying to improve the Start Menu’s functionality.
Microsoft just rolled out a new feature on the latest Release Preview build of Windows 11, allowing you to create folders in the Start Menu. Yes, if you are using the latest Release Preview or Dev build of Windows 11, you can now create folders in the Start Menu.
This small addition can help you organize your apps in the Windows 11 Start Menu. After grouping your apps into a folder, you will even have an option to rename the folder on the Start Menu. Hence, if you are interested in creating app folders in Windows 11 Start, here are the steps you need to follow.
Steps to Create App Folders in Windows 11 Start Menu
Important: To create app folders in Start Menu, your PC should be running on Windows 11 Build 22621 or higher. If you are using an older build, update it to the latest version and follow the steps.
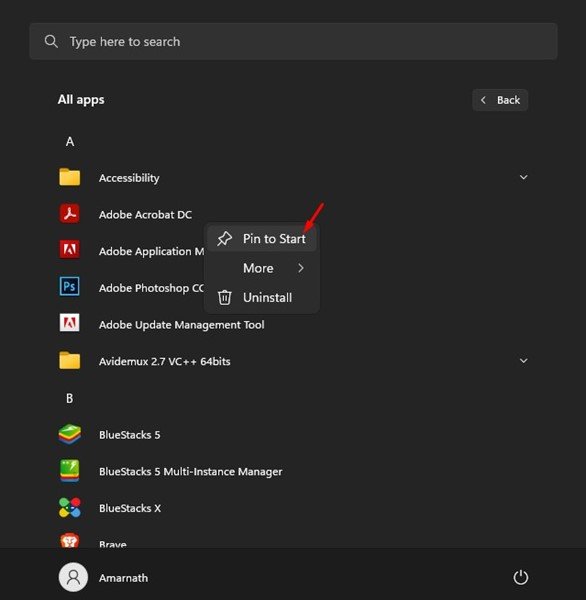
1. First, click on the Windows 11 Start button. On the Start menu, click on the All Apps.


2. You need to pin your favorite apps to the Start Menu. To pin an installed app, right-click on the app name and select the ‘Pin to Start’ option. After pinning the apps, you can put them in a folder.


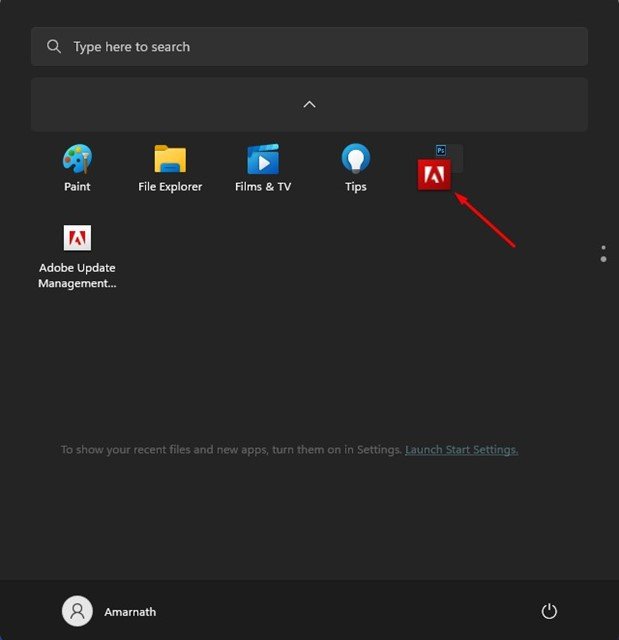
3. After pinning all your favorite apps to the start menu, you can create a folder. To create a folder, you must drag an app onto another one.


4. You can drag and drop many apps into a single folder on the Start menu.
That’s it! This is how you can create app folders in Windows 11 Start Menu.
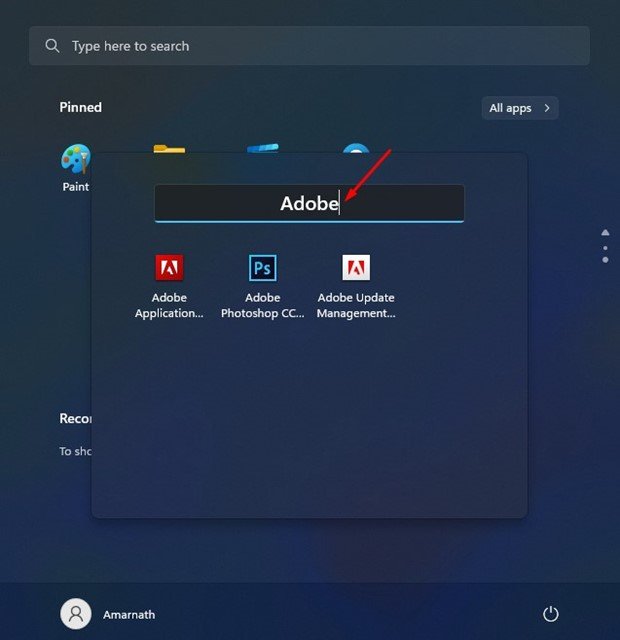
Well, it’s pretty easy to rename app folders in the Start Menu. For that, open the Start menu and the app folder you want to rename.


The folder will open and will show you all the apps it has. On the top, you will have an option to rename the app folder. Type in the name and close the folder.
Unfortunately, there’s no direct way to delete an app folder in Windows 11 Start Menu. Hence, you must manually drag all the apps out of the folder.


That’s it! This is how you can create and manage app folders on your Windows 11 PC. Dragging out all apps will immediately remove the folder from your Start Menu.
Also Read: How to Switch From Windows 11 Dev to Beta Channel
So, this guide is about creating and managing an app folder in Windows 11. If you cannot create app folders, you need to install the latest version of Windows 11. If you need any more help, let us know in the comments.
