Last Updated on October 19, 2023 by Larious
Windows 11 supports various touchpad gestures out of the box. The touchpad gestures are important since they provide easier navigation, but they can also serve as a hindrance in many situations.
For example, if you have a gaming laptop, you may want to turn off the Touchpad completely to avoid accidental touches. Also, if you use an external mouse, it’s a wise idea to turn off the touchpad to preserve power & prevent accidental touches.
So, is it possible to disable touchpad on Windows 11? Yes! You can easily disable the touchpad on your Windows 11 laptop, and there are various ways to do it. You can disable the touchpad from Settings, Device Manager, Registry, etc.
Table of Contents
6 Methods to To Disable Touchpad in Windows 11
So, if you use an external mouse for gaming, streaming, etc., and want to disable the touchpad to prevent accidental touches, continue reading the article. Below, we have shared some simple methods to turn off touchpad on Windows 11. Let’s get started.
1) Disable the Touchpad using the Keyboard Shortcut
The easiest way to disable the touchpad on Windows 11 is by pressing the keyboard shortcut. You will also find a dedicated button on your laptop keyboard with a canceled touchpad sign.
You can press that button on your laptop by holding the FN key. Usually, the key combination to turn on/off touchpad is FN + F7 Key. This will immediately disable the touchpad on your Windows 11 computer.
2) Disable Touchpad from Windows 11 Settings
The next best & easiest way to turn off the touchpad on Windows 11 is by using the Settings app. Here’s how you can turn off touchpad on Windows 11 via Settings.
1. Click on the Windows 11 Start button & select Settings.

2. When the Settings app opens, switch to the Bluetooth & devices tab.

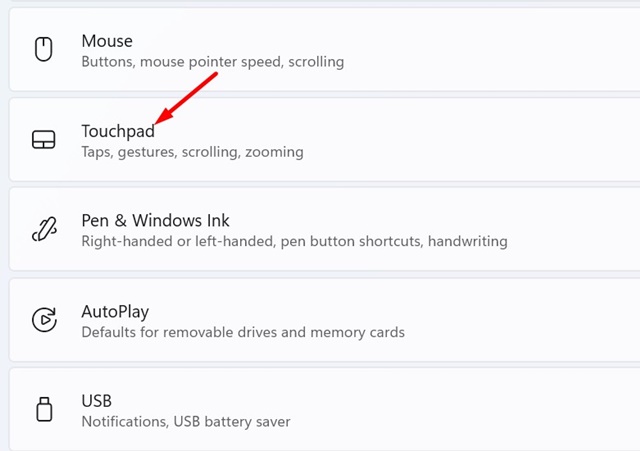
3. On the right side, click on the Touchpad.

4. Next, turn off the toggle for Touchpad.

That’s it! This is how you can disable the touchpad on Windows 11 via the Settings app.
3) Disable the Touchpad Automatically When the Mouse is Connected
If you want Windows 11 to disable the touchpad automatically whenever an external mouse is detected, follow these steps. Here’s how to turn off touchpad automatically when the mouse is connected.
1. Open the Settings app on your Windows 11 computer.

2. On the left side, click on the Bluetooth & Device.

3. On the right side, expand the touchpad section.
4. Now uncheck the ‘Leave touchpad on when a mouse is connected’ option.

That’s it! Windows 11 will automatically disable your laptop’s touchpad whenever you connect an external mouse.
4) Disable Touchpad via Device Manager on Windows 11
You can also utilize the Device Manager utility on Windows 11 to disable the touchpad. For that, follow some simple steps we have shared below.
1. Right-click the Start button or press the Windows Key + X key to open the Power User Menu. When the Power User Menu opens, select Device Manager.

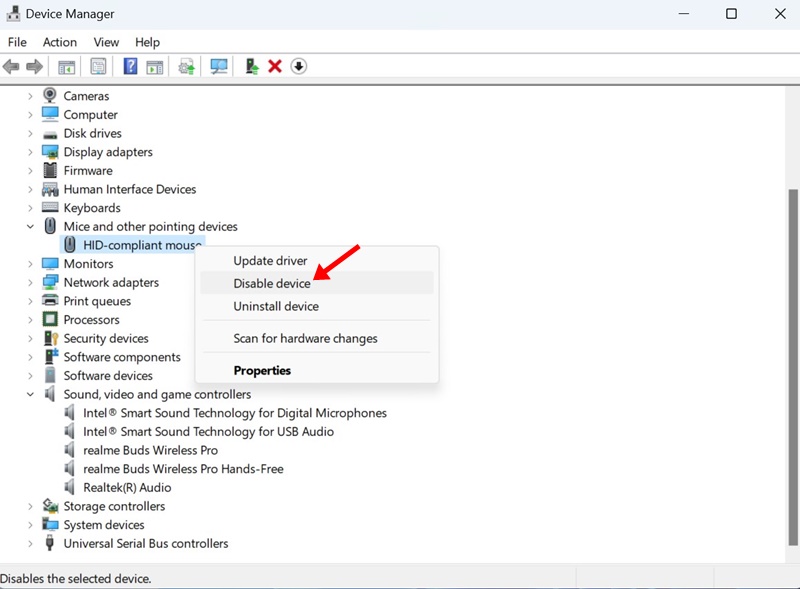
2. On the Device Manager, expand the Mice and other pointing devices.

3. Right-click on your touchpad and select Disable Device.

4. On the confirmation prompt, click on Yes.

That’s it! This will disable the Touchpad on your Windows 11 laptop.
5) Disable Touchpad from the Control Panel
If you cannot access the Device Manager for any reason, you can access the same option from the Control Panel. Here’s how you can disable touchpad on Windows 11 via the Control Panel.
1. Type in Control Panel on Windows 11 Search. Next, open the Control Panel app from the list of best-match results.

2. When the Control Panel opens, click on Mouse.

3. On the Mouse Properties, switch to the Hardware tab and click Properties.

4. On the Touchpad Properties, click on Change Settings.
5. Now switch to the Driver tab. Next, click on the Disable Device.

6. On the confirmation prompt, click on the Yes button.
That’s it! This is how you can disable Touchpad on Windows 11 via Control Panel.
6) Disable Touchpad on Windows 11 using Registry Editor
If you cannot disable the Touchpad on your Windows 11 computer, you can follow this method. This method requires editing the Registry file; hence, follow the steps carefully.
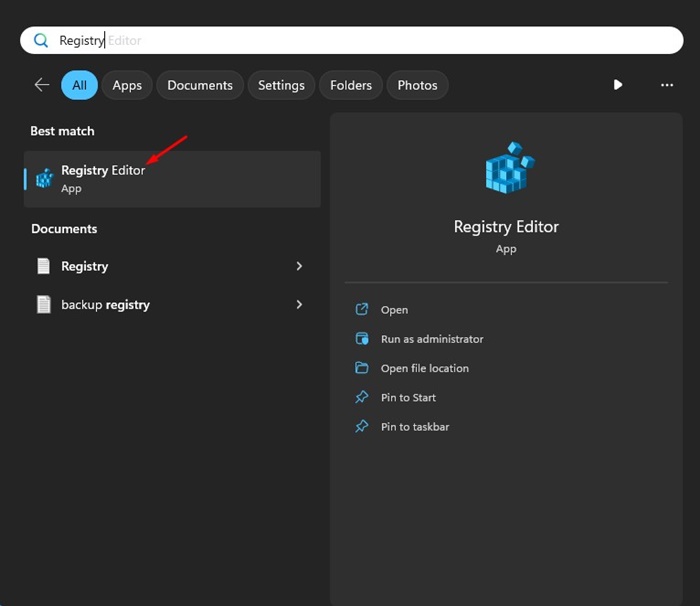
1. Type Registry Editor on the Windows 11 Search. Next, open the Registry Editor app from the list of Best match results.

2. When the Registry Editor opens, navigate to this path:
ComputerHKEY_CURRENT_USERSOFTWAREMicrosoftWindowsCurrentVersionPrecisionTouchPadStatus

3. On the right side, double-click on the Enabled entry.

4. On the Value data field, type 0 and click OK.

That’s it! Now close the Registry Editor & restart your Windows 11 laptop to apply the changes. After the restart, you won’t be able to use the Touchpad again. If you wish to enable the touchpad, change the Value data of the Enabled Entry to 1 and apply the changes.
So, these are a few simple methods to disable the touchpad on Windows 11. You can also use third-party apps to turn off the hardware components of your PC/Laptop, like the touchpad, but third-party apps are not necessary. You can follow the methods shared in this article to enable/disable the touchpad in Windows 11 computer/laptop. Let us know if you need any more help on this topic.

