Last Updated on February 11, 2024 by Larious
After installing the iOS 17 v3 Beta update, many users face problems with the Apple ID Verification. According to users, the ‘Apple ID Verification’ error appears out of nowhere, preventing access to iCloud.
The error could frustrate you since the login credentials being used are correct. The ‘Verification Failed’ Apple ID error can prevent you from accessing essential services like iCloud & App Store.
Table of Contents
How to Fix ‘Apple ID Verification Failed’ on iPhone (9 Methods)
If you already get the Apple ID Verification failed error on your iPhone, continue reading the article. Below, we have shared some simple methods to fix the ‘Apple ID Verification Failed’ error on iPhone.
1. Make sure your iPhone is connected to the Internet
Your iPhone must be connected to WiFi or mobile data to complete the Apple ID Verification process. So, if your internet isn’t working, your internet connection is the first thing to check.
If your iPhone is already connected to the internet via WiFi or mobile data, visit fast.com to check if your internet is working.
You can also try toggling the Airplane mode on your iPhone to rule out internet connectivity issues. Open the Control Center and tap on the Airplane icon to turn on the Airplane Mode.
Once done, tap on the Airplane icon again to turn off the Airplane mode. Alternatively, you can restart your iPhone.
2. Check Apple’s Server Status
Although rare, it’s absolutely possible that Apple’s server status is down during the verification. Like every other web-based service, Apple’s servers are often down for maintenance or when it faces problems.
So, before you try the troubleshooting, it’s important to visit this webpage from your preferred web browser and check the server status.
If the ‘Apple ID’ status reads available, there’s no problem. However, if the status reads ‘Not available’, you must wait a few hours and try.
3. Disable the VPN
VPNs are great for protecting your online privacy, but sometimes they could trigger errors like ‘Apple ID Verification failed’. This happens due to the regional mismatch that leads to authentication issues. Here’s how to disable VPN.
1. Open the Settings app on your iPhone.
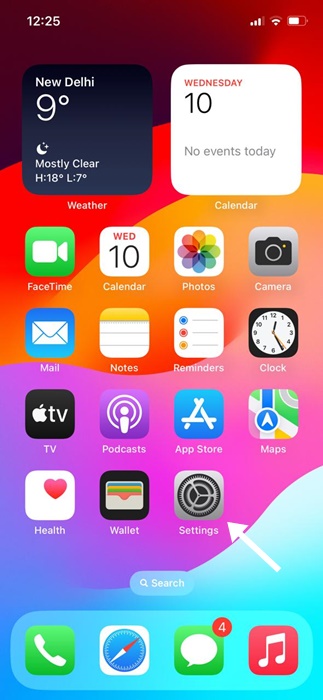
2. When the Settings app opens, select General.

3. On the General, tap ‘VPN & Device Management’.
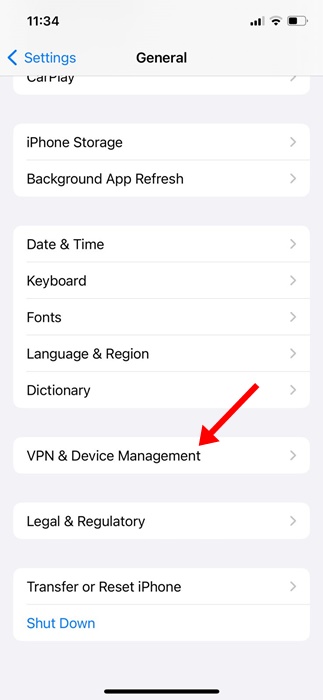
4. Next, turn off the toggle beside VPN Status (if enabled).
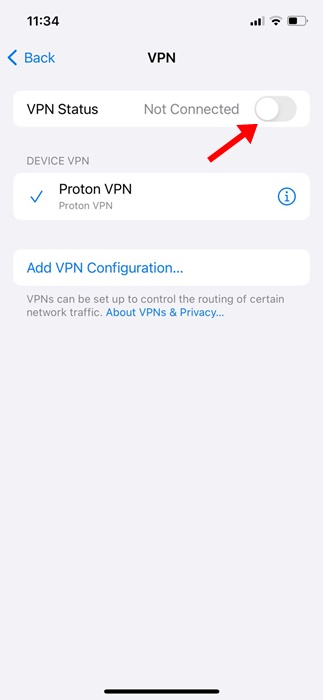
After disabling the VPN, restart your iPhone to fix the authentication problem.
4. Sign out of App Store & Sign back in
Another best thing you can do to fix the Apple ID Verification failed error is to sign out from the Apple App Store & Sign back in.
1. Open the Apple App Store on your iPhone.
2. When the App Store opens, tap on the Profile Picture at the top right corner.
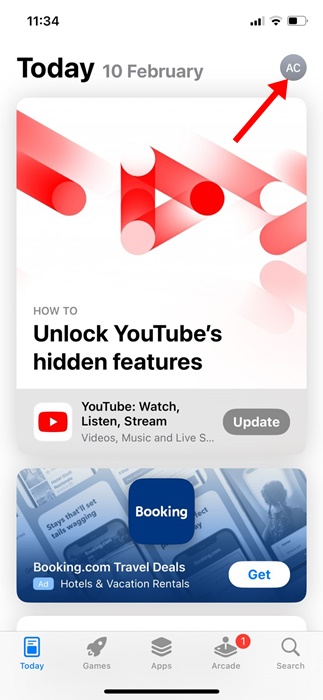
3. On the Account screen, scroll to the bottom and tap Sign Out.

4. To sign back in, tap the profile icon at the top-right corner.
5. On the Account pop-up, tap Sign in With Apple ID.
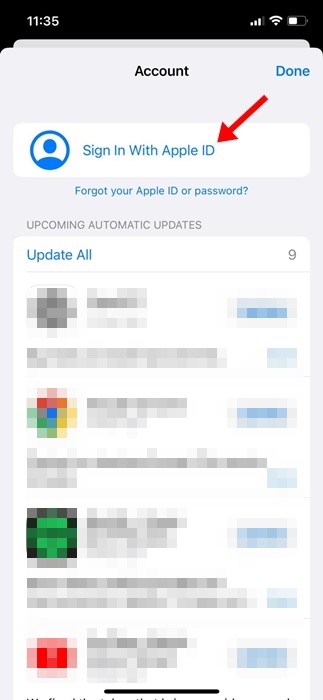
That’s it! Enter your Apple ID credentials to sign in to the Apple App Store.
5. Check the Date & Time on your iPhone
Incorrect time zone selection can lead to authentication problems; hence, it’s important to check whether the time zone selection is correct on your iPhone.
1. Open the Settings app on your iPhone.

2. When the Settings app opens, tap on General.

3. On the General screen, tap on Date & Time.

4. On the Date & Time screen, ensure the toggle for ‘Set Automatically’ is enabled.

That’s it! This is how you can set the correct Date and Time settings on your iPhone.
6. Change your Apple ID Password
Maybe you are using the wrong credentials to sign in to your Apple ID. So, you can also try updating the password for your Apple ID.
Also, periodically changing your account password is a good security practice. This rules out the risk of hacking attempts.
To change your Apple ID password, follow the steps shared below.
1. Open the Settings app on your iPhone.

2. When the Settings app opens, tap on your Apple ID at the top.

3. On the next screen, tap Sign-in & Security.
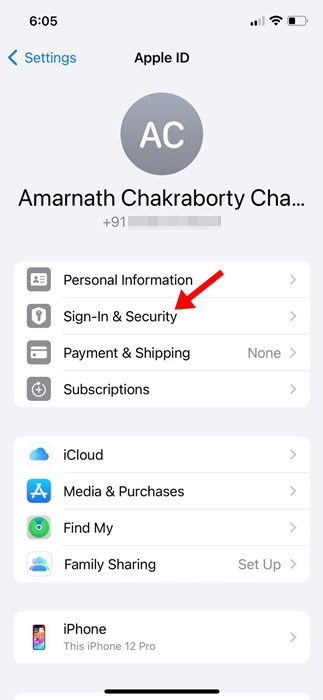
4. On the next screen, tap on Change Password.

That’s it! This is how you can update the password for your Apple ID to fix the verification failed issue.
7. Reset the Network Settings
Resetting the network settings has helped many users fix the Apple ID Verification failed errors. Hence, you can try doing it as well. Here’s what you need to do.
1. Open the Settings app on your iPhone.

2. When the Settings app opens, tap on General.

3. On the General screen, tap on Transfer or Reset iPhone.

4. On the next screen, tap on the Reset.
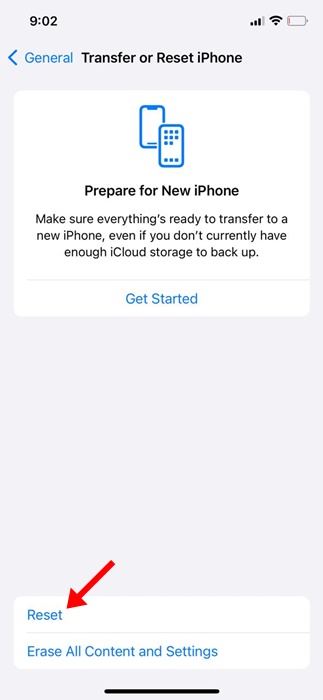
5. On the prompt that appears, select Reset Network Settings.
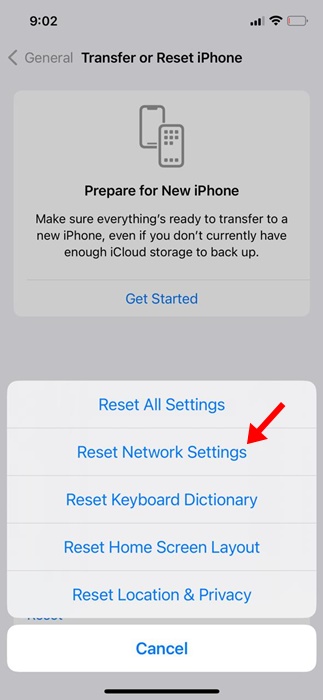
That’s it! You will be asked to enter your Passcode to proceed with the network reset process.
8. Take the help of Siri to Disable the WiFi
A user on the Apple forum has pointed a fix for ‘Apple ID Verification failed’ error. If the Apple Verification failed error appears after a major update, you can ask Siri to disable your WiFi.
Now, how does it solve the problem? Well, Siri can turn off the WiFi, and once the WiFi is disabled, you will get an option to skip logging in to your Apple ID.
So, the goal here is to complete the setup process without connecting to a WiFi network or signing in to Apple ID. Once you reach the iPhone Home screen, you can log in to your Apple ID again.
9. Contact the Apple Support team
If you still get the ‘Apple ID Verification Failed’ error message, even after following all these troubleshooting methods, it’s time to seek the help of Apple’s support team.
You can reach out to Apple Support from this webpage. You can use any web browser to access the page and seek help.
Also, you can consider reaching out to the local Apple store to get help in person. You need to explain the problem you’re facing along with the troubleshooting methods you’ve tried.
So, this guide is about fixing the Apple ID Verification failed error on iPhone. Let us know in the comments if you need more help on this topic. Also, if you find this guide helpful, don’t forget to share it with your friends.

