Last Updated on February 18, 2024 by Larious
File Explorer is one of the most used utilities of the Windows operating system. Although Microsoft revamped the user interface of its File Explorer on Windows 11, its functionality remains the same.
With File Explorer, you can quickly locate files and folders on different drives and format your existing drive. While the File Explorer on Windows 11 is mainly bug-free, it still sometimes runs into problems.
Many Windows 11 users have recently reported facing problems while using the File Explorer Utility. According to the users, the File Explorer is stuck at the ‘Working on it’ error and can’t get past it.
Table of Contents
How to Fix File Explorer Stuck At ‘Working on It’ in Windows 11
So, if you are a Windows 11 user facing the same File Explorer ‘Working on It’ error message, continue reading the guide. Below, we have shared some simple steps to fix File Explorer Stuck at working on it error on Windows 11. Let’s get started.
1. Restart the Windows 11 PC
The very first thing you can do if File Explorer is stuck at working on it error is to restart your computer. Restarting will possibly remove all bugs & glitches that may be preventing the file explorer from functioning properly.
Also, it’s a good idea to restart the computer at regular intervals. To restart your Windows 11 PC, click the Power menu and select Restart.
2. Restart the Windows Explorer
If restarting didn’t help, you can try restarting the Windows Explorer process from the Task Manager. Windows Explorer is a program manager process that provides the graphical interface you use to interact with most windows.
So, if the File Explorer is not working on your Windows 11, the best you can do is to restart the Windows Explorer process. To restart the Windows Explorer process from the task manager, follow the steps we have shared below.
1. Type in Task Manager on the Windows 11 search. Next, open the Task Manager app from the list of best-match results.

2. When the Task Manager opens, switch to the Processes tab.

3. Right-click on the Windows Explorer and select Restart.
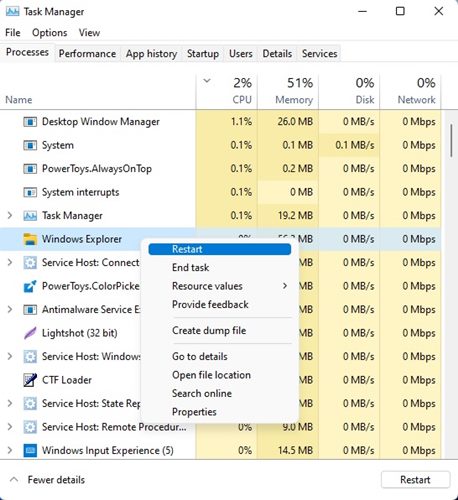
That’s it! This will instantly restart the Windows Explorer process on your computer.
3. Reconnect the External Devices
If not properly plugged in, external Devices can trigger File Explorer problems. The File Explorer may get stuck at ‘Working on It’ if the external device you’re trying to access isn’t properly plugged.
So, it’s important to reconnect the external device before you try the next methods.
4. Clear the File Explorer History
Like every other app on your PC, the File Explorer on Windows 11 also stores the cache file on your system installation drive. If this cache file is corrupted, the File Explorer will return with a ‘Working on it’ error message. So, you can try clearing the File Explorer cache to resolve this issue. Here’s what you need to do.
1. Type in File Explorer Options on the Windows 11 search. Next, open the File Explorer options from the list of best-match results.
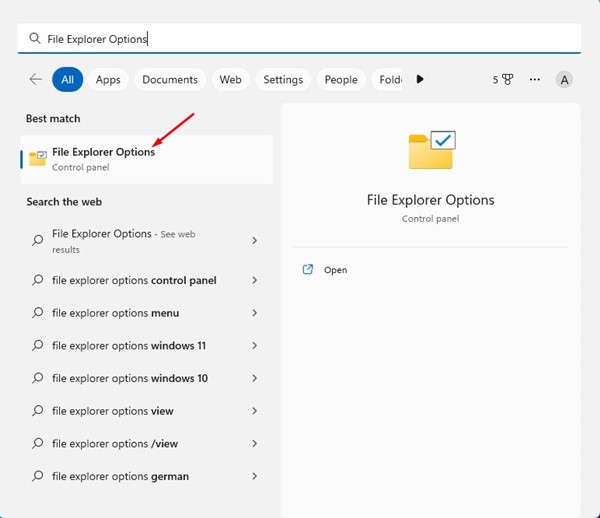
2. When the File Explorer options opens, switch to the General tab.
3. Now, on the Privacy section, click on the Clear button.
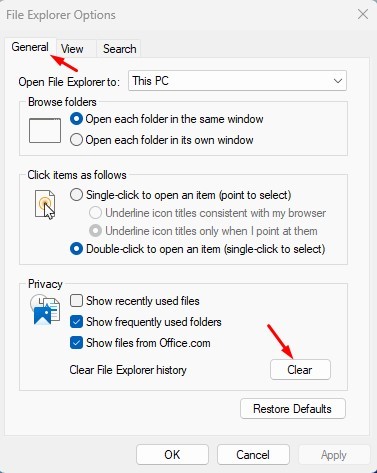
4. Next, on the Open File Explorer to: drop-down, select This PC and click Apply.

That’s it! After making the changes, restart your Windows 11 PC. This should fix the File Explorer slow problem on your PC.
5. Optimize the Folders for General Items
If you have a folder where you store files in different formats, it’s recommended that you optimize that folder for general items. This may fix the File Explorer Stuck at ‘Working on it’ error message. Here’s what you need to do.
1. Launch the File Explorer utility on your PC.
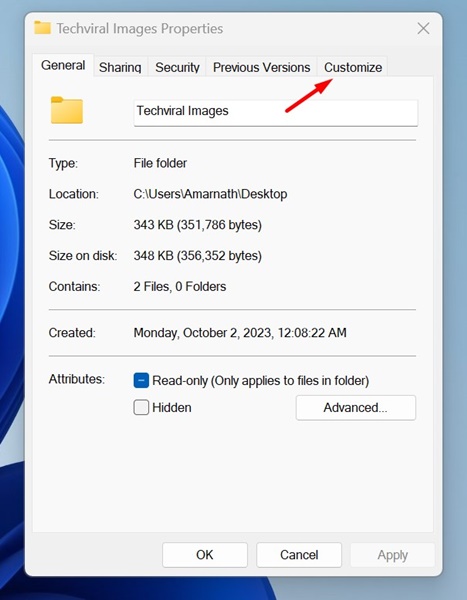
2. Right-click on the Folder, which takes time to open, and select Properties.
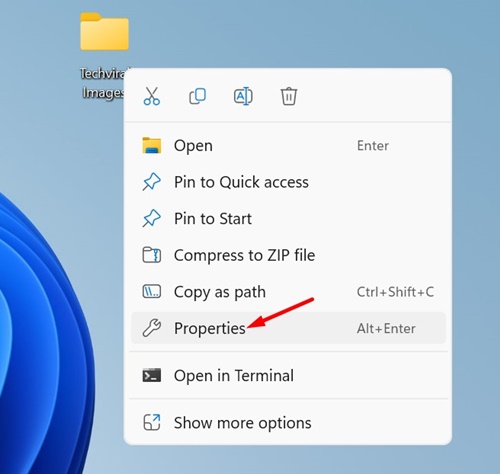
3. Now switch to the Customize tab.
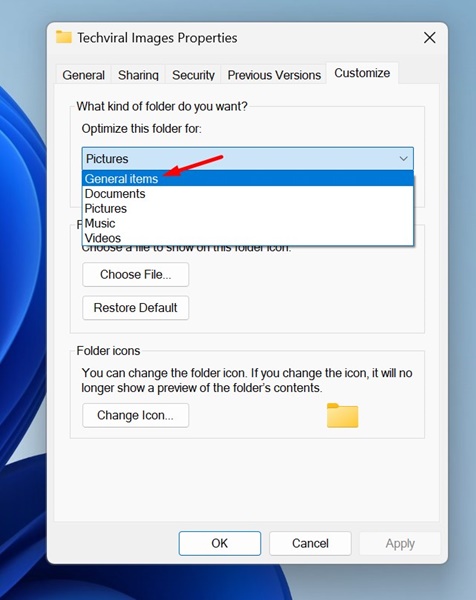
4. On the Optimize this folder for drop-down, select General items.
5. After making the changes, click on the Apply button.
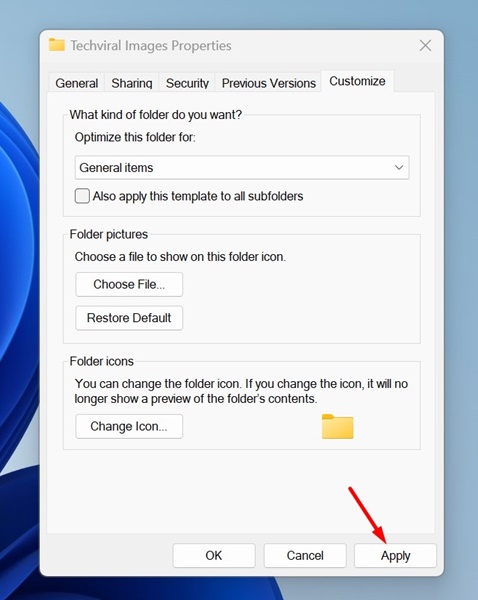
That’s it! This is how you can fix File Explorer stuck at working on it error on a Windows 11 computer.
6. Rebuild the Search Index
If you get the ‘Working on it’ File Explorer error while searching for specific files, it’s best to rebuild the entire search index. This will also resolve issues like being unable to type in File Explorer search. Here’s what you need to do.
1. Type in Indexing options on the Windows 11 search. Next, open the Indexing Options on the best match result.
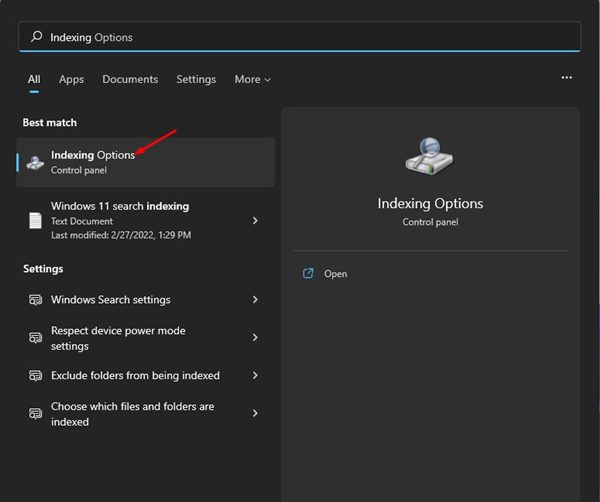
2. When the Indexing Options opens, click on the Advanced button.

3. In Advanced Options, switch to Index Settings.
4. Now click on the Rebuild button in the Troubleshooting section.
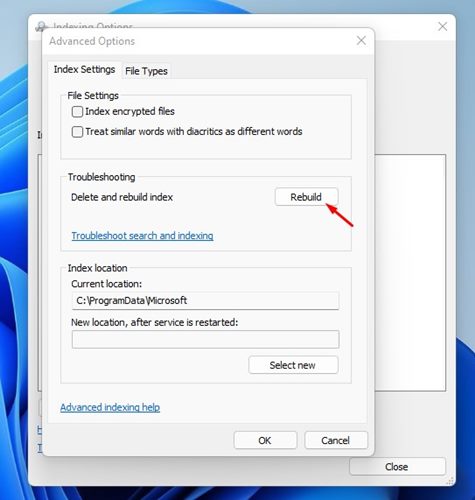
That’s it! After making the changes, click OK to close the Indexing options prompt.
7. Run a full Antivirus Scan
If your PC is infected with harmful viruses or malware, you can face problems accessing the files & folders through the file explorer.
So, it’s very important to run a full Antivirus scan with the Windows Security program. This may fix File Explorer stuck at working on it problem. Here’s what you need to do.
1. Type in Windows Security on the Windows Search and press Enter.

2. When the Windows Security app opens, switch to the Virus & Threat Protection.
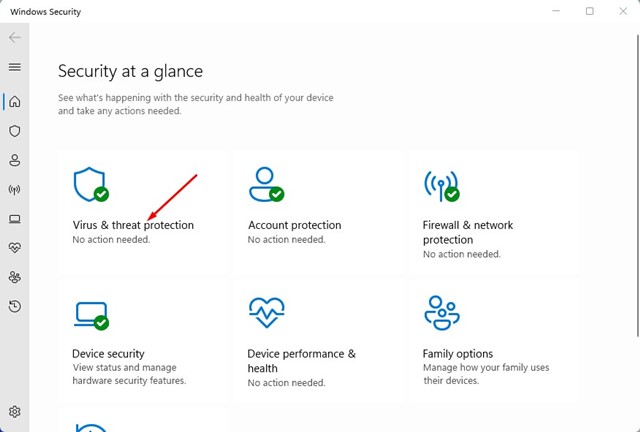
3. On the right side, click on the Scan Options.

4. Next, select Full Scan and click on Scan Now.
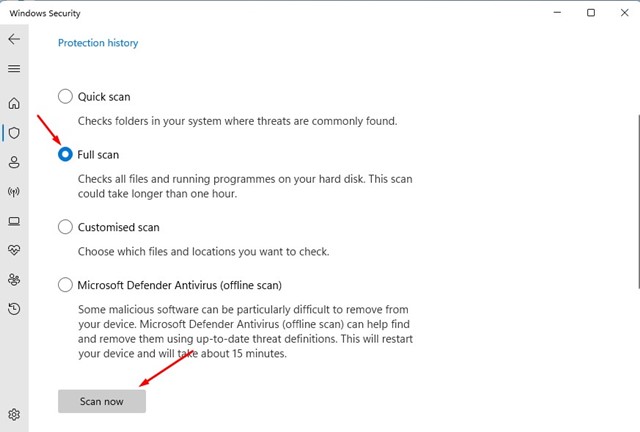
Now, you must wait until the Windows Security app completes the scan. Once finished, access the File Explorer again.
8. Run the SFC/DISM Command
System file corruption is another reason for File Explorer showing a ‘Working on it’ screen. If the screen is stuck in ‘Working on it’, you must run both the SFC & DISM Command via the Command Prompt. Here’s what you need to do.
1. Type in Command Prompt on the Windows 11 search. Right-click on the Command Prompt & select Run as administrator.

2. When the Command Prompt opens, paste the command and press Enter.
sfc /scannow

3. If the Command returns with an error, paste this command and press Enter.
DISM /Online /Cleanup-Image /RestoreHealth
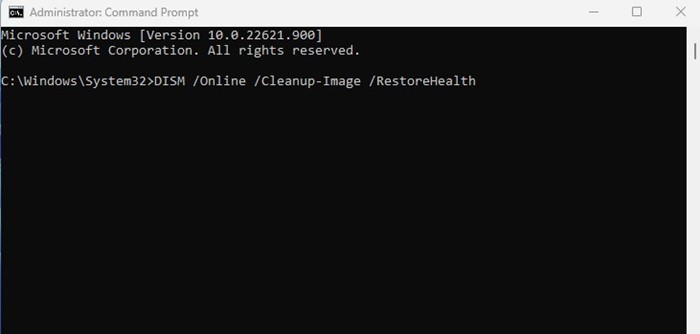
That’s how easy it is to run the SFC/DISM command on Windows 11 to fix corrupted system files. Make sure to restart your PC after running these two commands.
9. Run the Disk Cleanup Utility
If you still get the ‘Working on It’ screen on the File Explorer, your hard drive is likely failing. Or, your hard disk may have less storage space. So, it’s best to run the Disk Cleanup utility to free up storage space on a PC.
1. Type Disk Cleanup on the Windows 11 search. Next, open the Disk Cleanup app from the list of best-match results.

2. On the Drive selection prompt, select the drive that you want to clean.

3. The disk cleanup utility will automatically pick the files that can be deleted. Click on the OK button.

4. On the Disk Cleanup confirmation prompt, click the Delete Files button again.
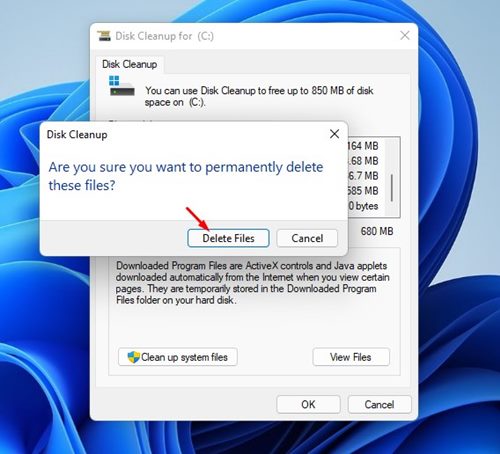
This is how you can run the Disk Cleanup utility on Windows 11 to fix problems with the File Explorer.
10. Update your Windows 11
Bugs in specific Windows 11 versions have already troubled many users. Chances are that File Explorer is stuck at the ‘Working on it’ screen just because of an existing bug in the operating system.
You can quickly eliminate such bugs by updating your Windows 11 to the latest version. It’s a good security practice to keep the operating system up-to-date, as you will not only be able to enjoy the new features but also rule out privacy and security issues.
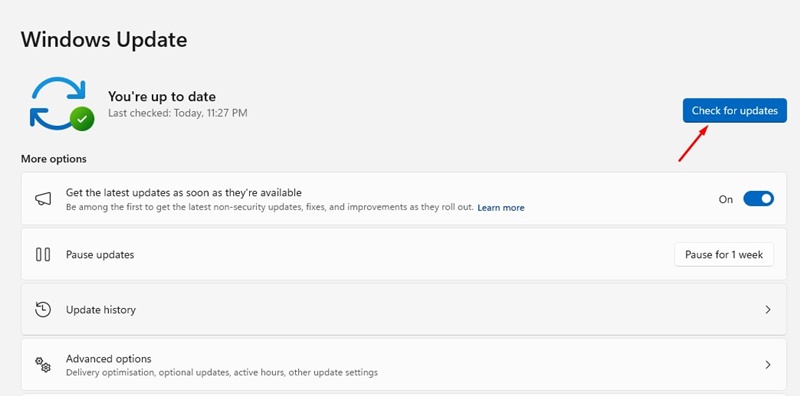
To update your Windows 11 PC, go to Settings > Windows Updates > Check for Updates. Now, Windows 11 will find all available updates and download and install them.
So, these are some of the best ways to fix File Explorer stuck at the ‘Working on it’ screen. If you have followed all methods correctly, the issue is likely already fixed. Let us know which method worked for you to fix the Windows 11 File Explorer problem.
