Last Updated on October 4, 2023 by Larious
While using the Windows operating system, you may have encountered an error code in the Device Manager that reads ‘This Device is Disabled. (Code 22)’. This error message prevents a user from using the installed device.
Even though the Device Manager doesn’t state anything about the error message, it can be troubleshooted easily. So, if you cannot use a specific device due to the ‘This Device is Disabled’ error message, continue reading the guide.
Table of Contents
How to Fix ‘This Device is Disabled’ Code 22 Error in Windows
This article will discuss what the ‘This Device is Disabled Code 22’ error message means and how you can resolve it. After resolving the error message, you can use the disabled device easily. Let’s get started.
1. Restart your Computer
The very first thing you should do after encountering the ‘This Device is Disabled’ Error Code 22 is to restart your device.
Sometimes, bugs & glitches prevent you from using all installed devices on your computer. And the best way to deal with such bugs & glitches is by restarting your PC.
Also, restarting the computer regularly is a good practice that you should make a habit. You can restart your Windows PC by clicking the Start Menu and selecting the Power Button. On the Power Menu, click on the Restart option.
2. Replug the new Hardware
If you have just installed a new hardware device on your computer and it shows you the error, you need to unplug and replug it.
It’s possible that the new hardware that you have plugged into your PC may start working after a quick reinstallation.
So, before trying the advanced methods, make sure to unplug and replug the new hardware device.
3. Enable the Hardware from the Device Manager
If any particular device is showing a ‘This Device is Disabled’ error on the Device Manager, you need to re-enable it from the Device Manager itself. Here’s what you need to do.
1. Press the Windows Key + S button on your keyboard to open Windows Search. Type Device Manager on the Windows Search and open the most relevant result.

2. When the Device Manager opens, right-click on the hardware device, showing you the error.
3. On the right-click menu, select Enable Device.

After making the changes, use the hardware. Now, you can use the disabled hardware device on your computer.
4. Update the Device
Outdated device drivers or driver incompatibility is another prominent reason for the ‘This Device is Disabled (Code 22)’ error message on the Device Manager. Updating the device drivers helps most of the time; hence, you can also try doing it. Here’s what you need to do.
1. Type in Device Manager on the Windows Search. Next, open the Device Manager app from the list of best match results.

2. When the Device Manager opens, right-click on the device showing you the Code 22 Error and select Update Driver.

3. On the next prompt, select ‘Search Automatically for drivers‘.

That’s it! Now, follow the on-screen instructions to complete the driver installation process.
5. Uninstall the Device Driver
If re-enabling or updating the device driver didn’t help, you can try uninstalling the device driver completely. This has helped many Windows users resolve the ‘Device is disabled (Code:22)’ error message.
1. Type in Device Manager on the Windows Search. Next, open the Device Manager app from the list of best match results.

2. When the Device Manager opens, right-click on the problematic device and select Uninstall device.

3. On the Uninstall Device confirmation prompt, select Uninstall.

That’s it! Once you uninstalled the device, restart your computer. Windows will automatically install the relevant driver again & enable the device.
6. Install the Older Versions of Driver

Maybe the latest version of the drivers available for your hardware component has a bug preventing you from using the device. So, you can try rolling back to an earlier version of the driver.
Or else, you need to download the older version of drivers from the official website & install it manually. To do that, you need to find the manufacturer’s webpage and explore the list of driver released for the device.
Once you find your device, download the older version of the drivers released a few weeks or months ago. Once downloaded, install the drivers to resolve the issue.
7. Check if the device is working
Sometimes, it’s possible that the new device you just plugged in is faulty and needs to be replaced. If that was the issue, you must ensure the device you’ve plugged in is not faulty.
You can try inserting the same device on any other computer/laptop to see if it works. If it’s showing the same error on every computer, you need to get your device replaced.
8. Update the operating system

Updating the operating system isn’t a sure-shot fix to the error, but it can still help. Also, it’s a good practice to keep the operating system up to date as system updates often contain security patches, bug fixes, driver updates, etc., that are important for proper stability & performance.
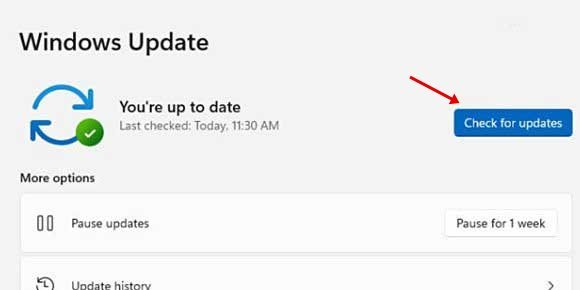
Updating the Windows operating system is easy; open the Settings app and switch to the Windows Update. On the right side, click on the Check for updates button. This will immediately search for all available updates (including the driver updates); click the Download & install button.
9. Perform a System Restore
If the hardware device functions properly, you still get the ‘This Device is Disabled’ Code 22 error message on the device manager; it’s time to perform a system restore.
However, to perform a system restore, you must already have a restore point. Even if you don’t remember creating a restore point, you can still try it because some programs often create restore points before making changes to the system. Here’s how you can perform a system restore on Windows.
1. Type in Recovery on the Windows 11 Search. Next, open the Recovery app from the list of best match results.

2. On the Recovery Screen, click on the Open System Restore.

3. On the Restore system files and settings prompt, select Choose a different restore point and click Next.

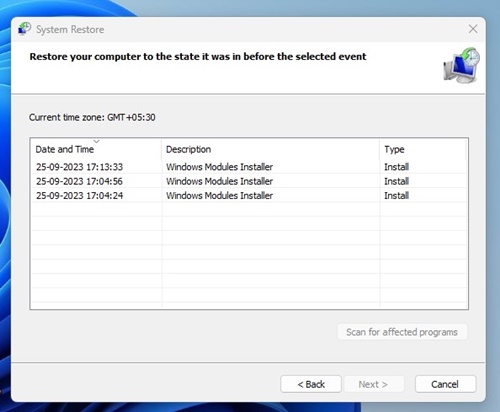
4. Now select the restore point of the timeframe when you’re not having any issues with the device. Once selected, click on the Next button.

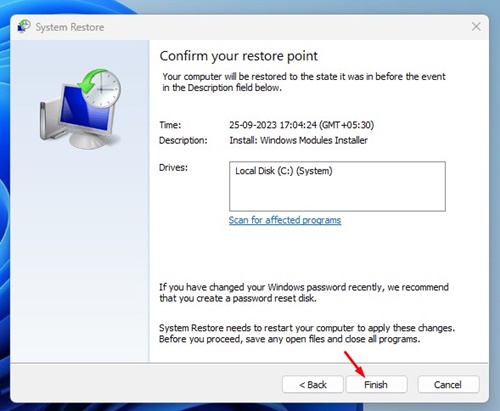
5. On the Confirmation prompt, click on the Finish button.

That’s it! That’s how easy it is to fix Device is Disabled (Code 22) Error on Windows.
10. Update BIOS

The latest version of BIOS often contains important security patches, firmware updates, and other bug fixes that are important for the proper functioning of hardware devices.
So, if everything else has failed to fix the ‘This device is disabled’ code 22 error on Windows Device Manager, it’s time to update the BIOS.
However, updating BIOS is not an easy task, especially if you don’t have any technical knowledge. The best you can do is to visit your motherboard’s manufacturer’s website and follow the instructions.
You can even watch several YouTube videos to know how to update BIOS to the latest version.
So, these are some of the best ways to fix the ‘This Device is Disabled’ (Code 22) Error in the Windows operating system. Let us know which method worked for you to resolve the Device Manager error on your Windows 10/11 computer.

