Last Updated on October 1, 2023 by Larious
Microsoft released Windows 11 a few years ago, and it’s still the latest version of Windows available for PCs/Laptops. Many new features & changes have been introduced, and Microsoft also upped the system requirements for running Windows 11.
Among all requirements, the requirement for a TPM hardware chip frustrates everyone who wants to try Windows 11. Even when the TPM Hardware chip is available on the motherboard, users are getting a ‘TPM Device Not Detected’ error.
So, if you desperately want to give Windows 11 a try but are unable to do so because a TPM device is not detected, continue reading the guide. Below, we will discuss why the ‘TPM device not detected’ error appears and how to fix it.
What is TPM?
Before you understand why the ‘TPM Device Not Detected’ Error appears, knowing what exactly TPM is and how it works is important.
TPM or Trusted Platform Module is basically a hardware chipset placed on your PC/Laptop motherboard. It’s an international standard for a secure cryptoprocessor.
TPM is all about security; it offers hardware level protection and is used to encrypt the disks using Windows features like Bitlocker, Windows Hello PIN, etc. On Windows 11, TPM 1.2 or 2.0 is mandatory for proper security; without it, you can’t install the operating system.
Table of Contents
How to Fix the ‘TPM Device Not Detected’ Error?
Now that you know what TPM is, you may want to fix the ‘TPM Device Not Detected’ error to install Windows 11. Here are the best ways to fix the TPM device not detected error on Windows 10 computer.
1. Make sure your motherboard has a TPM Chip
Before you attempt to resolve the error, it makes sense to check whether your motherboard & CPU has a TPM chipset.
TPM device not detected error message can mean that your motherboard doesn’t have it. If TPM is not available, you can’t do anything.
So, it’s recommended to look up your motherboard & CPU online to see if it has TPM 2.0 listed as an official part of device specifications.
2. Check if TPM is Enabled in BIOS

If TPM is available on your PC, but you still get the ‘TPM device is not detected’ error, it’s time to check if TPM is enabled in BIOS. If TPM is not enabled in the BIOS, you can enable it to fix the error message.
It isn’t very easy to enable TPM from a BIOS/UEFI because BIOS differs depending on the brand & model of the motherboard. You can watch some YouTube videos or check the motherboard manual for instructions on enabling TPM from BIOS.
If you don’t want to watch any video or read the motherboard manual, check out our guide – How to Enable TPM 2.0 in Windows PC.
3. Update BIOS or UEFI
If the TPM is already enabled on the BIOS/UEFI, but you still get the TPM device not detected error message, you need to update the BIOS or UEFI.
However, updating BIOS is not an easy task, especially if you don’t have any technical knowledge. Incorrect BIOS settings can lead to various problems which can’t be fixed easily.
The safest option to Update BIOS is to disable the Bitlocker device encryption, visit the OEM website, and download the latest BIOS firmware for your PC. Once downloaded, run the installer file & follow the on-screen instructions.
Another option is to take your PC/Laptop to the nearest service center and ask them to update the BIOS. This is the safest option to update the BIOS/UEFI firmware.
4. Reinstall the TPM Driver
If the TPM 2.0 shows up in your Device Manager, you can reinstall the TPM driver. Here’s what you need to do.
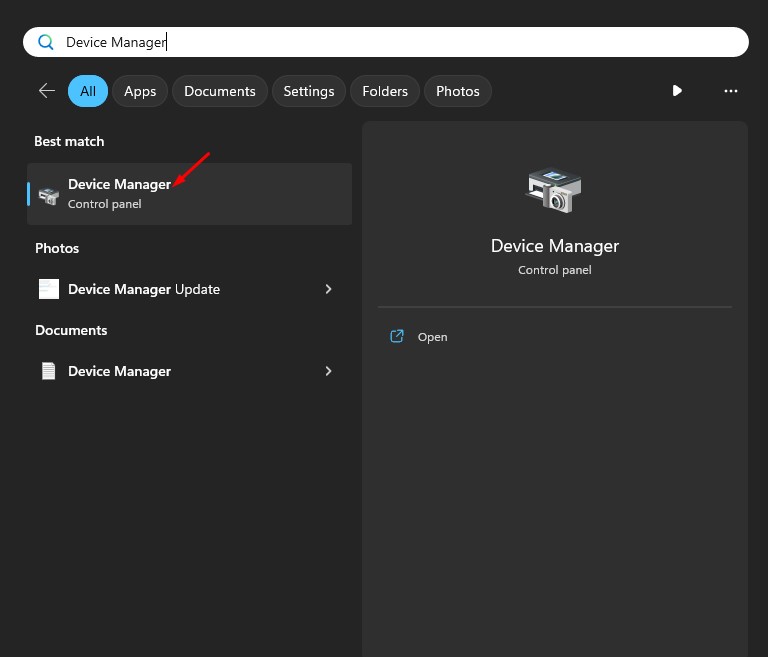
1. Click on Windows Search & type Device Manager. Open the Device Manager app from the list.

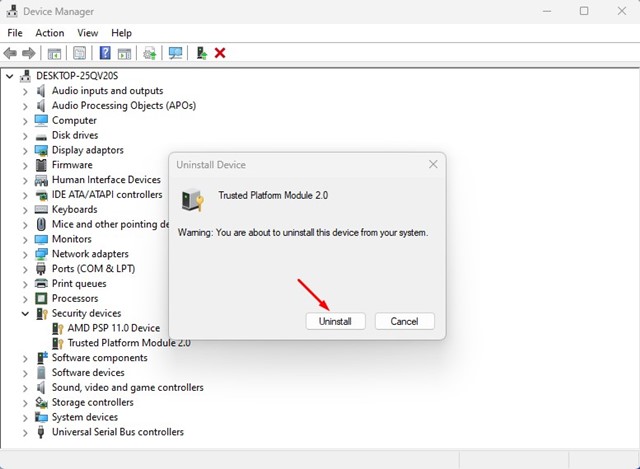
2. When the Device Manager opens, expand the Security Devices.

3. Right click on the Trusted Platform Module and select Uninstall Device.

4. On the confirmation prompt, click on the Uninstall again.

5. Once the TPM driver is uninstalled, restart your computer.
That’s it! Restarting the computer will automatically install the TPM driver again.
5. Unplug the Battery/CMOS

Well, this is a very common solution to reset the PC BIOS. If you have a laptop, you can power down the device and remove the battery.
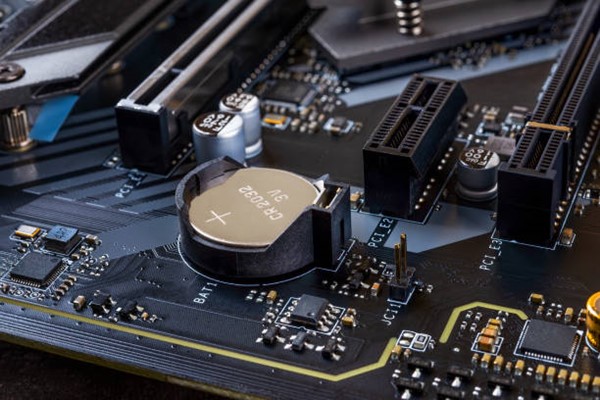
If you have a desktop computer, you need to open the CPU cabinet & take out the CMOS. For those unaware, CMOS is basically a term used to describe the memory on a computer motherboard that stores the BIOS settings.
Removing the CMOS battery removes all BIOS settings. So, you can try removing the CMOS battery (only if you have technical knowledge) to reset the BIOS settings to default.
6. Bypass the Windows 11 TPM Requirements
Those who want to enable TPM for Windows 11 installation can rely on this method. There’s a way to bypass Windows 11’s TPM Requirement; you must use several third-party apps.
You must check out our guide – How to Bypass Windows 11 TPM Requirement, to explore all available options. Another easier method is to create a Bootable USB drive with the Rufus utility.
Rufus provides an option to remove the Secure Boot and TPM 2.0 requirements. To use Rufus to bypass the Windows 11 requirements, check out this guide – How to Create a Bootable USB to Bypass Windows 11 Restrictions.
So, this guide is about fixing the ‘TPM Device Not Detected’ error. If your PC has a TPM chip and you’ve followed all methods, the issue was likely already fixed. Please let us know which method worked for you to fix the Windows 11 TPM error.
