Last Updated on June 27, 2020 by Larious
In this guide, we have shared some of the best methods to Boost Game Performance In Windows 10 computers. Let’s admit, everyone loves to play games on their smartphone and computer. If we talk about the games, users always prefer desktops over smartphones. This is the reason why users assemble a gaming computer. The good thing about desktop computers is that you can upgrade the hardware.
However, having high-end hardware is not always enough to provide you seamless gaming experience. It doesn’t matter how powerful hardware your PC has, if they were not optimized, then your games’ speed will suffer. They will lag and won’t look as beautiful as they could.
Table of Contents
How To Boost Up Game Performance In your Windows PC
Therefore, in this article, we have decided to share some of the best methods to optimize your PC and make it faster for gaming. These methods would help you to boost the in-game FPS and increase your GPU’s overall performance. So, let’s check out how to boost up the game performance in your Windows PC.
1. Adjust Your Computer’s Power Settings
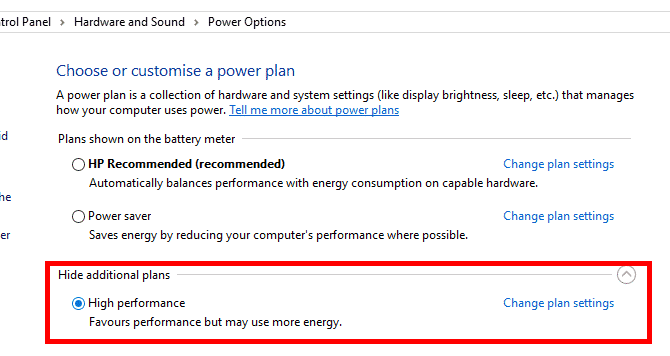
Well, on Windows 10, Microsoft introduced few power modes that can improve or degrade your system performance. If you really want to boost up the gaming performance, then you need to head to the Power Options and then select the ‘High Performance’ Mode. The setting favors performance but may use more energy. The great thing is that after the gaming session, you can switch back to the ‘Recommended’ settings.
2. Close Background Apps
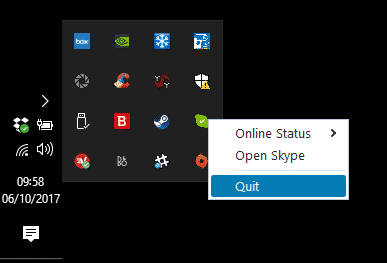

Background apps and services play an important role in deciding your computer’s performance. Some of the apps and processes can ruin your gaming experience on Windows 10. So, before playing any game, make sure to close all resource-demanding applications from the Task Manager. Also, disable services like Windows Updates, Background Intelligent Tasks, etc.
3. Upgrading The Graphics Driver:


Well, this is the most important thing that is needed to be done first. If you love to play games, then make sure your computer has the latest drivers installed for your graphics card. If you have GPU of NVIDIA GeForce or AMD Radeon then you can find the latest drivers for their GPUs on the respective websites. Don’t completely rely on the disc that came with your Graphics card because the drivers might be outdated.
NVIDIA: http://www.geforce.com/drivers
AMD: http://support.amd.com/us/Pages/AMDSupportHub.aspx
We have also shared an article where we have listed some of the best driver updating tools. These tools can automatically scan and update outdated drivers.
4. Supercharge Your Graphics Card


It’s of no doubt that the gaming performance on Windows 10 computer is entirely dependent on the power of your graphics card. Most of the graphics cards available nowadays allows users to overclock. 5-10 years ago Overclocking was considered as one of the riskiest things, but nowadays most systems turn themselves off automatically before they take severe damage. So, a slight overclock doesn’t hurt and in order to get the best gaming experience, you can slightly overclock by about 10 to 15%.
5. Use AVG PC TuneUp’s Uninstaller and Program Deactivator


Well, AVG PC TuneUp is one of the best and leading PC tune-up utility that you can use right now. The best thing about AVG PC TuneUp is that it has almost everything that you need to improve gaming performance. The tool basically shows users the apps that they don’t use. Not just that, but AVG PC TuneUp also lets users know which program is consuming CPU and GPU resources. So, its an all-in-one tool that will definitely improve the gaming performance.
6. Using 3D-Analyzer
Well, there are more and more games being released each year, it’s not possible to upgrade the computer’s GPU for each and every high-end games. Therefore, we need to use 3D analyze which lets you play the latest games using your old GPU. Let’s know how to use 3D-Analyzer.
Step 1. First of all, download and install 3D-Analyzer software on your Windows computer.


Step 2. Launch the software, and you will see the screen like below.
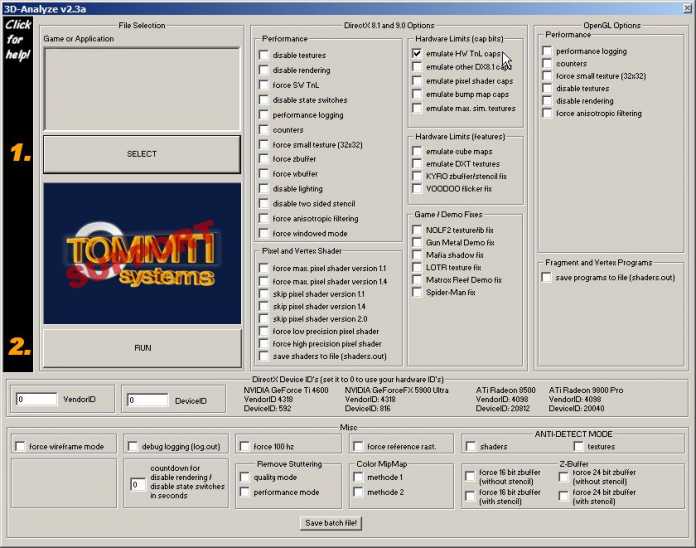

Step 3. Now you need to find the button “Select” where you need to select the game you want to run on your Windows computer.


Step 4. After selecting the file path, the game will get listed in the empty field; now you just need to click on VendorID as 4098 and DeviceID 20400. I want to select the ATi Radeon 9800 PRO graphics card; you can choose according to your wish. Now just click on run and your game will run with better quality now without lagging.


That’s it! Now run the game from 3D-Analyze software itself
7 Using Razer Cortex
As the gaming nerve center, Razer Cortex gives you access to an impressive arsenal of tools to take control of your gaming experience. Here’s how to use Razer Cortex to improve your gaming experience in Windows.
Step 1. First of all in your Windows PC, download and install this tool Razer Cortex. After downloading the tool, install on your Windows PC by clicking on next there.


Step 2. Now launch the app and you will see the boost section there click on it and you will see lots of customization there.


Step 3. Now you need to alter them according to your wish as you can enable the automatic boost there. Now after setting up all the possible settings, click on save option.
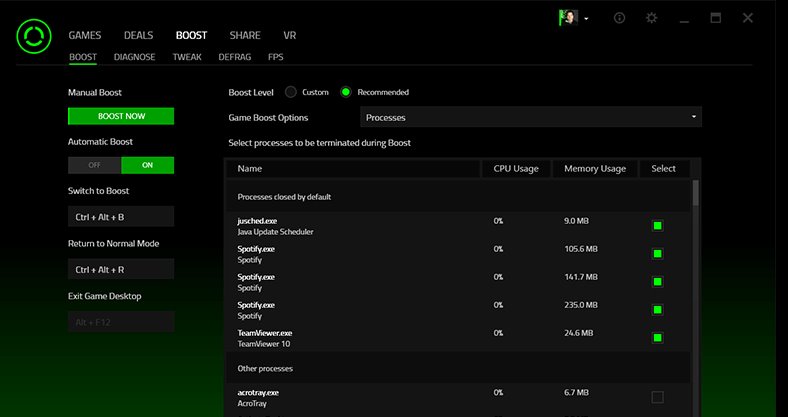

You can also use the Diagnose and Fps option there to enhance your gaming experience. That’s it; you are done, now play any of your favorite game and feel the difference.
8. Using SwiftShader


SwiftShader’s modular architecture is capable of supporting multiple application programming interfaces, such as DirectX® 9.0, and OpenGL® ES 2.0, the same APIs that developers are already using for existing games and applications. SwiftShader can, therefore, be directly integrated into applications without any changes to source code. It is also similar to 3D analyzer.
So, this article is all about how to boost up the game performance in your Windows 10 PC. I hope this article helped you! Share it with your friends also. If you have any doubts related to this, let us know in the comment box below.

