Last Updated on May 4, 2020 by Larious
Windows is right now the best and most used desktop operating system. The operating system is right now installed on millions of computers & laptops. Compared to every other desktop operating system, Windows offers users more features and customization options.
If we talk about the customization, you can apply skins, change wallpapers, change icons, etc. Not many would know, but Windows also lets you create invisible folders. Invisible folders could be useful if you want to hide your sensitive data.
We all have some sort of sensitive data on our computer which we want to hide from others. This is where the invisible folders come into use. You can store those sensitive data inside an invisible folder. No one could see the invisible folder, except you.
Table of Contents
How To Create Invisible Folders In Windows in 2020
So, in this article, we are going to share some of the best working methods to create an invisible folder on Windows 10 computers.
Step 1. First of all, create a new folder in any drive where you want to make the invisible folder.


Step 2. Now right-click on a folder and select properties and under customize tab choose change icon and select a blank icon for your folder.


Step 3. Now rename the folder, clear all the text already there and now press ALT button and typing 0160 of the numeric keyboard.


Step 4. Now the folder will become invisible and only you will be knowing about that folder and you can only access that to save your personal files there.
Creating The Folder And Hiding It Internally
In this method, you are not going to rename or change the file type. The feature is given in the windows initiating itself, That is very much undiscovered to many. So follow this useful method that will hide your Folder in no time.
Step 1. Select the folder you want to hide. Right-click on it and select the option of Properties which is located at the very last of the popup.


Step 2. Now you can see the option of “Attributes” in the General tab of Properties. Unselect the “Read Only” and select the option of “Hidden” And click on “Apply” and then ‘Ok’


Step 3. That’s it! The folder will be Gone. It’s more than invisible, you will not see the folder again until you bring it back. Let’s know how to bring it back.


How to Bring Back the Hidden Folder?
Step 1. Go to organize and then Click on “Folder And Search Option“


Step 2. You Can see the Folder Options There, You need to click on “View” Tab just beside The “General” Tab. You will See a “Hidden Files and Folder” Option there, now change the option to “Show Hidden files and folders” And click on Apply and then “Ok”


Step 3. Once you have saved the arrangements. You will be able to see your hidden folder’s Now you can change the Attributes to Read-only.


Using Free Hide Folder
Well, if you don’t want to rely on the manual option, then you need to use Free Hide folder software. It’s a free tool to hide files and folders on Windows 10 operating system.
Step 1. You need to download the Free Hide folder on your computer and install it.


Step 2. Once installed, open the software and you will see the screen like below.


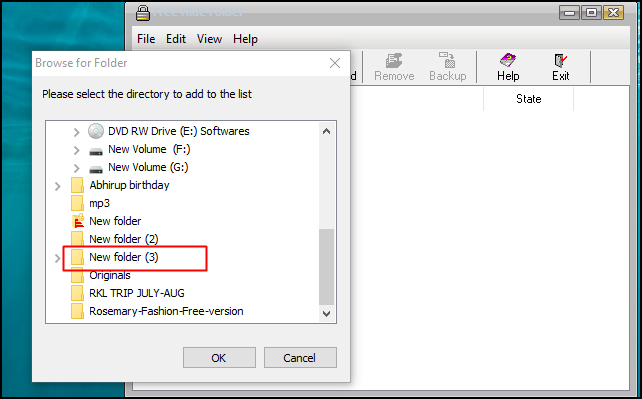
Step 3. Now you have to click on “Add” once you clicked on “Add” you need to browse the folder that you need to hide.


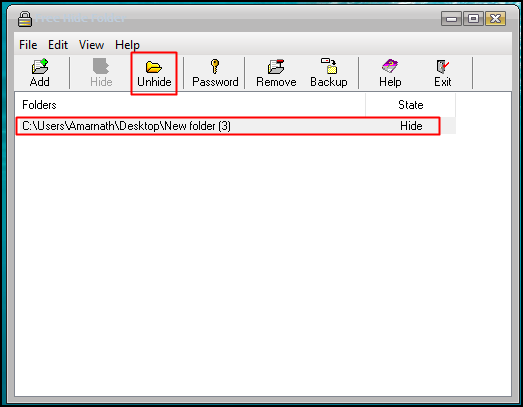
Step 4. Now simply click ok and you will see your folder will be hidden.


Step 5. Now If you need to unhide the folder simply open the software and click on the folder and select “Unhide”


That’s it! you are done! this is by far the easiest way to hide and unhide any folder on your computer.
So, this is how you can create invisible folders in Windows. I hope this article helped you! Share it with your friends also. If you have any doubts related to this, let us know in the comment box below.

