Last Updated on September 24, 2023 by Larious
Windows doesn’t show all errors that occur while you use your computer. To check all errors, you need to review the Event log of the Windows operating system. Windows 10/11 only shows you the critical errors and the ones that require immediate action.
To improve the operating system’s functionality and reduce errors, Microsoft added an Error reporting tool in Windows 10 and Windows 11. The error reporting tool tracks all errors on your device and sends them to Microsoft.
Table of Contents
What is Error Reporting on Windows?
Well, the Error Reporting feature is available on every Windows version. Be it Windows 7, 8, 10, or 11, you will find error reporting showing you alerts now and then.
The error reporting is the one that shows up after a specific program or system crash. The error reporting feature prompts you to send the information about the error/problem to Microsoft.
Many users want to disable this feature because this report usually holds private information about the PC. Many also want to disable it to stop viewing those annoying error-reporting alerts. The report that the feature generates has these pieces of information:
- Information about the problem/error
- Where the problem occurred (Hardware/software).
- Important logs to provide detailed information about the problem.
- Information about your PC’s specifications.
- Various information related to OS Compatibility.
Since the error reporting tool collects and sends the error information to Microsoft’s servers, it can raise your CPU & RAM resources. If you have a low- or mid-end computer, you may like to disable the Error reporting feature completely.
How to Disable Error Reporting in Windows 11
If you disable the error reporting in Windows 11, the tool will no longer run in the background, freeing up your system resources. Below, we have shared a step-by-step guide on how to disable Error Reporting in Windows 11. Let’s get started.
1) Disable Error Reporting in Windows 11 via Services
This method will use the Services app to disable the error reporting completely. Follow some of the simple steps we have shared below to turn off error reporting in Windows 11.
1. Click on the Windows 11 search and type in Services. Next, open the Services app from the list of matching results.
2. On the Services app, find the Windows Error Reporting service. Next, right-click on it and select Properties.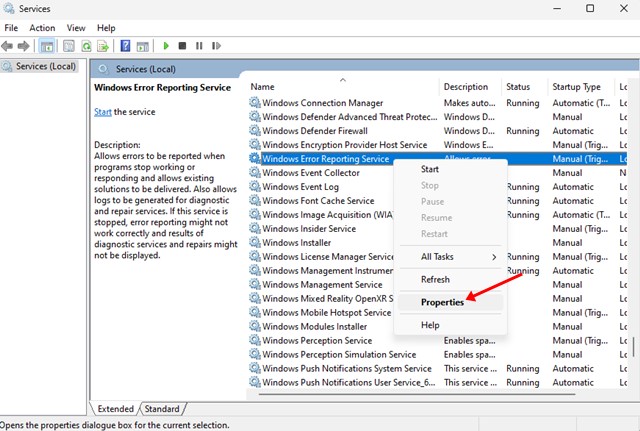
3. On the Windows Error Reporting Service Properties, switch to the General tab.
4. Select Disabled and click on the Apply button on the Startup type.
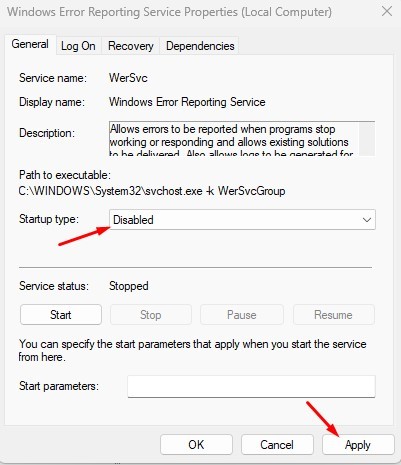
That’s it! This will disable the Error Reporting service on your Windows 11 computer.
2) Disable Error Reporting in Windows 11 Using Local Group Policy Editor
This method will use the Local Group Policy Editor to disable the Error reporting service. Follow some of the simple steps we have shared below.
1. First, click the Windows 11 search and type in Local Group Policy Editor. Next, open the Local Group Policy Editor app from the list of matching results.
2. Now, on the Local Group Policy Editor, navigate to the following path:
Computer Configuration > Administrative Templates > Windows Components > Windows Error Reporting

3. On the right side, find and double-click on the Disable Windows Error Reporting Policy.
4. On the Disable Windows Error Reporting policy, select Enabled and click on the Apply button.

That’s it! This will disable Error Reporting on your Windows 11 computer.
3) Turn Off Error Reporting in Windows 11 using Registry Editor
This method will use the Registry Editor to turn off the Error Reporting service. Here are some of the simple steps you need to follow.
1. First, click on the Windows 11 Search and type Registry Editor. Next, open the Registry Editor from the list of matching results.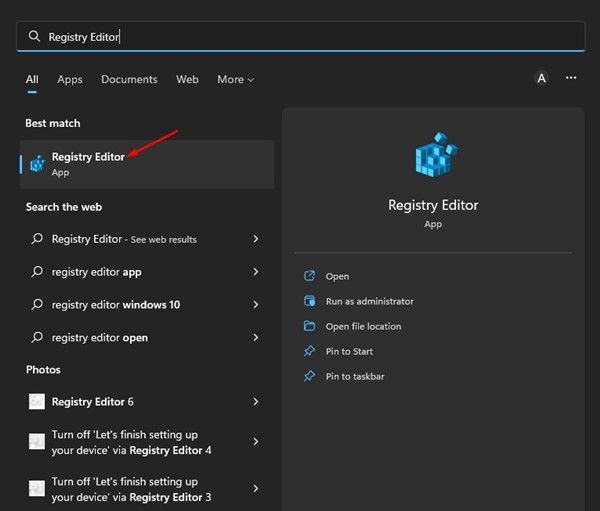
2. On the Registry Editor, navigate to the following path:
HKEY_LOCAL_MACHINESOFTWAREMicrosoftWindowsWindows Error Reporting
3. Right-click on the Windows Error Reporting and select New > DWORD (32-bit) Value.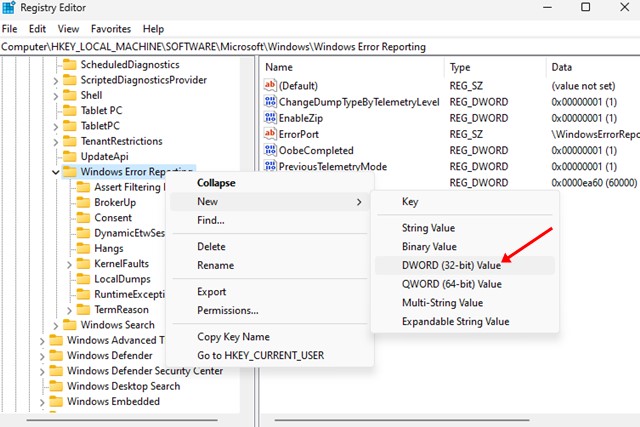
4. Name the newly created key as Disabled.
5. Double-click the Disabled REG_DWORD key and enter 1 in the Value Data field. Once done, click on the OK button and close the Registry Editor.
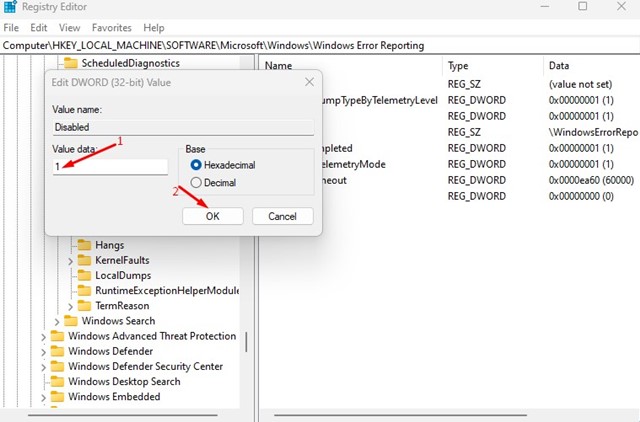
That’s it! This is how you can disable error reporting on your Windows 11 computer.
So, this guide is all about disabling error reporting on your Windows 11 PC. This service does nothing apart from sending your error reports to Microsoft. If you need more help disabling error reporting in Windows 11, let us know in the comments below.

