Last Updated on April 26, 2023 by Larious
Android provides many options to reduce mobile data usage, but what if you want to save data while connected to a WiFi network? You may have to use a WiFi connection with limited bandwidth; for example, if you’re using your phone’s hotspot connection with a laptop, you won’t want to drain your bandwidth.
While you don’t have many options to save internet bandwidth when connected to WiFi, you can still save some bandwidth by setting your WiFi network as a Metered connection on your Android.
Table of Contents
What is Metered Connection?
Metered connection or Metered network is simply a network that provides you with a limited amount of monthly data. For example, if the WiFi network you are connected to has a cap of 4GB of data usage per day, it’s a metered connection.
Metered Connection on Android neither compresses your data nor reduces the video streaming quality to save your data. Metered Connection is a term used to describe a network with limited internet data.
When you set a WiFi network as a metered connection, your Android device will treat the WiFi internet as mobile data and block actions such as updating apps, downloading system updates, and more.
Also read: How to Use Nearby Share on Android Device
Steps to Set WiFi as Metered Connection on Android
You can set any WiFi network you have connected to as metered. Here are some simple steps to set a WiFi network as a metered connection on Android. Let’s check out.
1. Pull down the notification shutter on your Android and tap Settings.
2. On the Settings app, tap on the Connections option.

3. Next, on the Connections screen, tap on the WiFi.

4. Now, you will see the WiFi network you are connected to. Tap on the Settings icon next to the WiFi network you’re connected to.

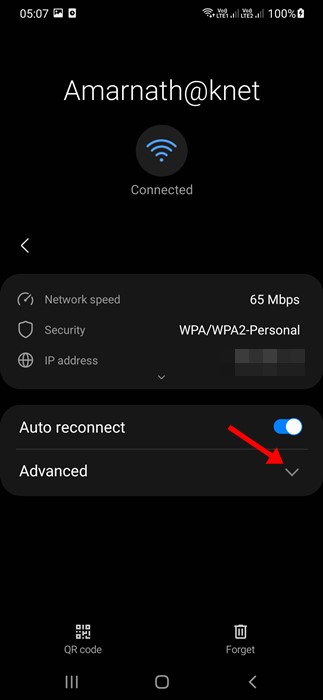
5. On the next screen, tap on the View More or Advanced options.

6. Next, tap on the Metered Network section and select the ‘Treat as metered’ option from the drop-down menu.

That’s it! This will set your WiFi network as Metered connection. From now on, your Android device will always treat that particular WiFi network as a metered connection.
Secondary Method
In some Android versions (Android 12 and above), you must follow a different method to set metered WiFi connection. If your phone doesn’t have the above option, follow these steps.
- First, open Settings and tap on ‘Network & Internet’.
- Next, tap on the WiFi or Internet, depending on what you’re using.
- Tap on your WiFi network name and select ‘Network Usage’.
- On the Network usage, tap on the ‘Treat as metered’.
That’s it! This is just another way of setting WiFi as Metered connection on Android.
Apart from setting WiFi as metered connection, you can use Firewall apps on Android to restrict apps from using your WiFi or mobile data.
So, that’s all about setting WiFi as a metered connection on an Android smartphone. You can use this method to force Android to treat your WiFi network as metered connection. If you have any doubts or need more help, let us know in the comments below.

