Last Updated on December 29, 2017 by Larious
Considering selling your Android phone? Want to be sure that you totally clean out the data on your Android phone before selling it? Whether you want to sell your unused phone for the extra cash or because you’re upgrading, ensuring that you wipe your Android phone clean of any personal information is very important as you don’t want your information ending up in the wrong hands and perhaps being misused.
If you’ve been looking for a proven and effective method to wiping your device clean prior to selling then look no further as we have a complete and detailed write-up prepared for you that will walk you thru the process of removing any and all information from your Android device.
In this guide, you’ll learn how to remove personal information from your Android device including:
- Your contacts (names and phone numbers)
- Financial information (saved payment data and transaction history)
- Accounts logins (logins to your apps such as Facebook)
- Email history (remove your email login/history from your Android device)
Table of Contents
Step 1 – Disabling Factory Reset Protection Feature
First and foremost, before you can begin the actual process of removing your personal information from your phone you will first need to “deactivate” a feature on your Android phone known as “Factory Reset Protection”.
This feature, also known as “FRP”, is a feature that Google introduced to Android phones as a part of their effort to keep thieves from stealing phones, resetting them and selling them.
How this essentially works is let’s say you initiate a factory reset on your phone that you want to sell and you do so “without” disabling the FRP. Upon the purchaser of the phone setting it up, the phone will prompt the user to input the password to the last Google account that was synced to the phone (which would be your account).
So, what you’ll want to do first is disable the FRP which can be done by navigating to “Settings” on your phone and then selecting the option that says something similar to “Lock Screen” or “Lock Screen Type”.
When at this page, select “None”. The goal is to have no lock screen to get in to the phone.

Step 2 – How to Encrypt Personal Information on Android Phone
One misconception or component of wiping an Android phone that oftentimes gets overlooked is the fact that someone could possibly recover personal data from a phone even once the factory reset has completed.
Hypothetically speaking, if you were to “factory reset” your Android device without your data being encrypted; an individual with access to the right software could potentially retrieve some if not all of the information that was stored on the phone.
Since a factory reset doesn’t actually “remove” the information that’s stored on your phone you’re left susceptible to your personal data getting in the wrong hands.
But no worries, by navigating to “Settings” and then “Security” you can easily protect yourself by simply selecting the option that reads “Encrypt Phone” (which should be done before your sell your Android phone).
Once you’ve selected the option to Encrypt your phone it’ll take roughly 20 minutes for it to complete at which point you’ll be ready to proceed to the final step of wiping your Android phone clean before selling.
Once encrypted, even with the use of software, any future owner of that device will be required to enter the PIN that you entered at the time of encryption meaning that your information will not be accessible.
The encryption adds a layer of protection between your data and the owner of the phone by blocking access to the data by requiring an encryption code.
Upon the completion of the encryption process, navigate to “Settings” in the phone and then “Accounts” and remove your synced Google account(s).

Step 3 – Initiating Factory Reset on your Android Phone
Now that you’ve disabled the “Factory Reset Protection” and have encrypted your Android device it’s time to start the factory reset so you can sell your phone with the peace of mind knowing that you protected yourself and personal information properly.
To start the factory reset you’ll need to first navigate to the phone “Settings” and then select the option in the menu that’s labeled “Backup & reset”. Once selected, follow thru to the prompt where it will ask for you to confirm your choice of resetting the phone (you’ll obviously select “yes”).
Once you’ve started the reset you can expect to wait for anywhere between 30-45 minutes although on some Android phone models users have reported a “factory reset wait time” of up to an hour. Regardless, the wait time is more-than-worth the security of knowing your information is protected!
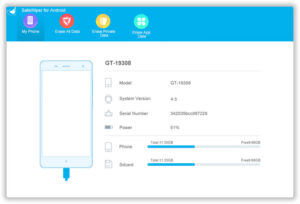
To be honest, the above process is a bit complicated and if you were looking for a less time-consuming method, then SafeWiper for Android is a good option to complete the task. It has 3 choices to erase data from Android phone or tablet, including Erase All Data, Erase Private Data and Erase App Data. Each method applies to different situations.

Also it is quite easy to use the program. First, download and install it on a computer. Then turn on USB debugging on the Android device and connect it to computer. When it is detected by SafeWiper for Android, then choose a method to erase the data. It would take a few minutes to finish the process. Have question about the program? You can go to its official site for answers.

