Last Updated on August 27, 2023 by Larious
We all know very well that few software solutions on the internet allow us to protect files with a password in the tech giant Microsoft’s Windows 10 and previous operating systems.
But today, we will follow a tutorial on how to protect files with a password in Windows without any program, and, of course, we will be able to do it completely for free.
Table of Contents
How To Password Protect Folders In Windows 10 Without Any Software
Few software solutions on the internet allow us to protect files with a password in the tech giant Microsoft’s Windows 10 and previous operating systems.
But today, we will follow a tutorial on how to protect files with a password in Windows without any program and for free. So, without wasting much time, let’s explore the tutorial below.
Also Read: Best Windows 10 Tips, Tricks, and Hacks
- Right-click on your desktop screen and select New > Text document. On the text document, paste the given script.
cls

@ECHO OFF

title Folder Locker

if EXIST "Control Panel.{21EC2020-3AEA-1069-A2DD-08002B30309D}" goto UNLOCK

if NOT EXIST Locker goto MDLOCKER

:CONFIRM

echo Are you sure or want to Lock the folder (Y/N)

set/p "cho=>"

if %cho%==Y goto LOCK

if %cho%==n goto END

if %cho%==N goto END

echo Invalid choice.

goto CONFIRM

:LOCK

ren Locker "Control Panel. {21EC2020-3AEA-1069-A2DD-08002B30309D}"

attrib +h +s "Control Panel. {21EC2020-3AEA-1069-A2DD-08002B30309D}"

echo Folder locked

goto End

:UNLOCK

echo Enter password to Unlock folder

set/p "pass =>"

if NOT %pass%==Your-Password-Here goto FAIL

attrib -h -s "Control Panel.{21EC2020-3AEA-1069-A2DD-08002B30309D}"

ren "Control Panel.{21EC2020-3AEA-1069-A2DD-08002B30309D}" Locker

echo Folder Unlocked successfully

goto End

:FAIL

echo Invalid password

goto end

:MDLOCKER

md Locker

echo Locker created successfully

goto End

:End
Important: Find the phrase “Your-Password-Here” and replace it with the password you want to protect your files.
- Now, click on the File > Save as.
- On the Save As prompt, save the notepad with a .bat extension like FolderLocker.bat. On the Save as type, select All Files and click the Save button.
- You will see that the file FolderLocker.bat has been created. Double-click on the bat file to enable a folder named locker.
- This is the folder where you can store the files you want to hide. Transfer the files you want to lock and click on the FolderLocker.bat file again.
- The command prompt will open and ask whether you want to lock your folder. Type Y and press the Enter button.
- The folder will disappear. To return the hidden folder, double-click on the Folderlocker.bat file and enter your password.
Password Protect Files on Windows 10 (Winrar)
WinRAR is a great utility to deal with compressed file formats. It can be used to lock files and folders with a password. Here’s how you can use the WinRAR free version to password protect files/folders in Windows 10.
1. Download & install the latest version of Winrar on your computer.
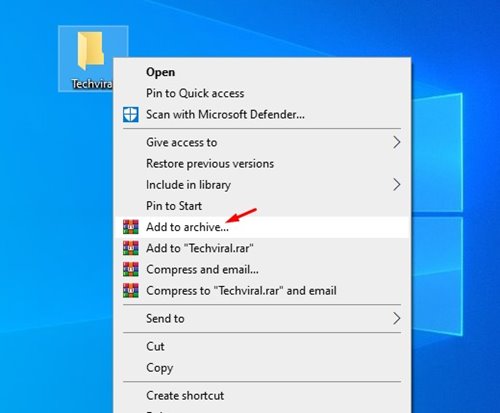
2. Now right-click on all files/folders you want to encrypt.
3. On the context menu, select Add to Archive.

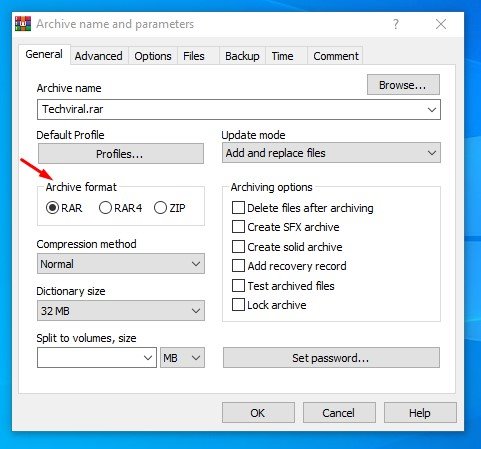
4. Enter the archive name, select RAR on the archive format.

5. Next, click on the Set Password button as shown below.

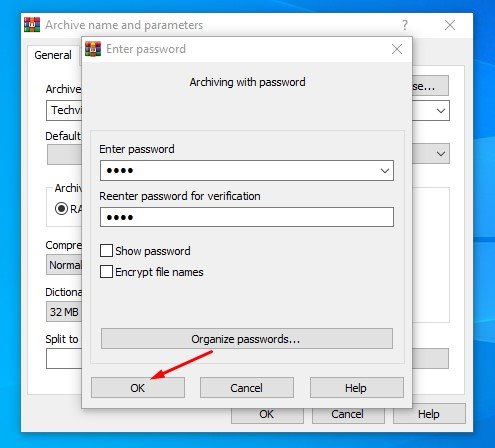
6. On the Enter password prompt, type the new password and click OK.

That’s it! This will create a RAR file, which will be encrypted. Anyone who tries to access the folder will be asked to enter the password.

So, what do you think about this? Share all your views and thoughts in the comment section below. And if you liked this tutorial, do not forget to share this tutorial with your friends and family.

